1 Overview
This article will describe how to complete an one time payment of digital download with firebase and stripe, using jekyll template.
2 Download Project
- Get ZIP : Directly fetch the download link.
Unzip the project to your local disk.
3 Setup Jekyll
Notice that:
If you are not using Jekyll to build your website, you can directly use the files inside _site folder.
Otherwise, you can config the jekyll environment as follow.
- Install Ruby, using following command to check installation.
$ ruby -v
ruby 2.2.4p230 (2015-12-16 revision 53155) [i386-mingw32]
- Install Jekyll using following command:
$ gem install jekyll
- Start jekyll server as follow.
$ cd projectfolder
$ jekyll serve
- Open the browser : http://localhost:4000/ , see more detail
4 Setup Email Extenstion
In order to send email to your customer, you can use following firebase Extension:
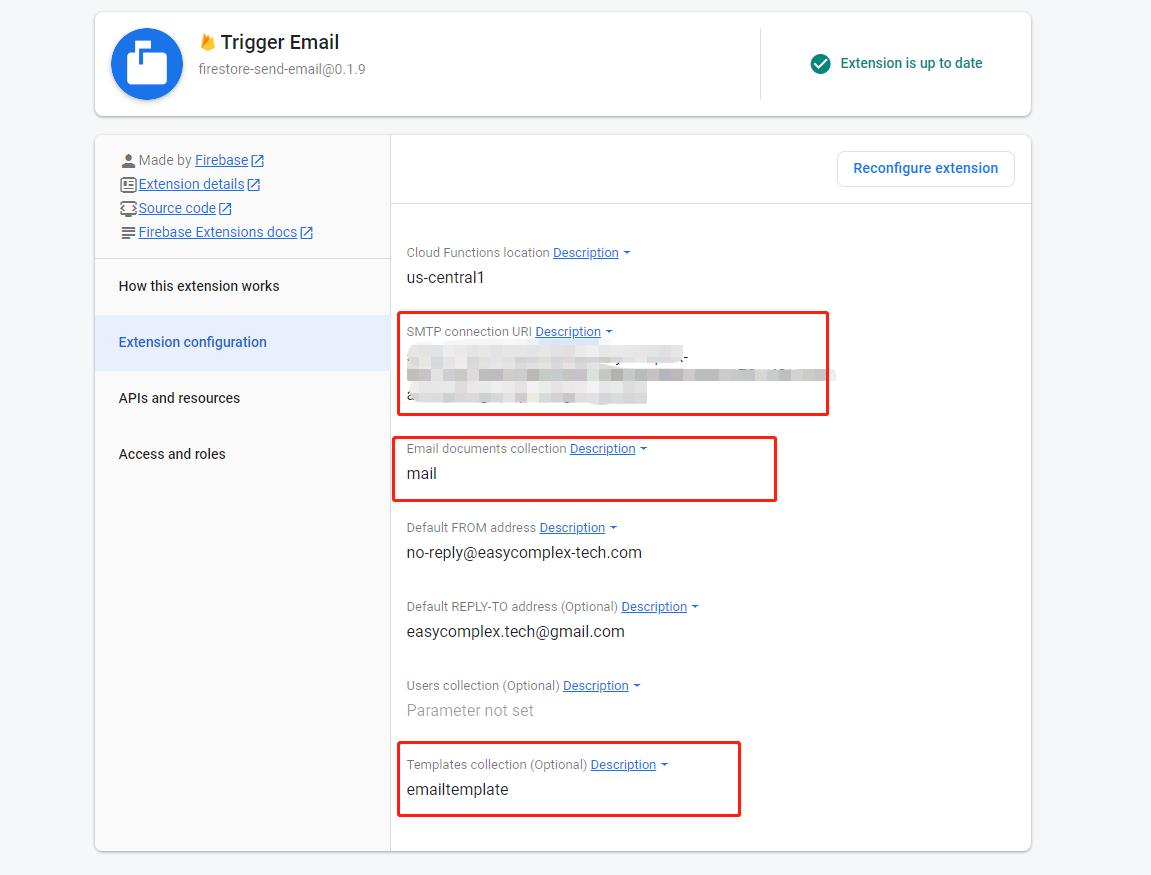
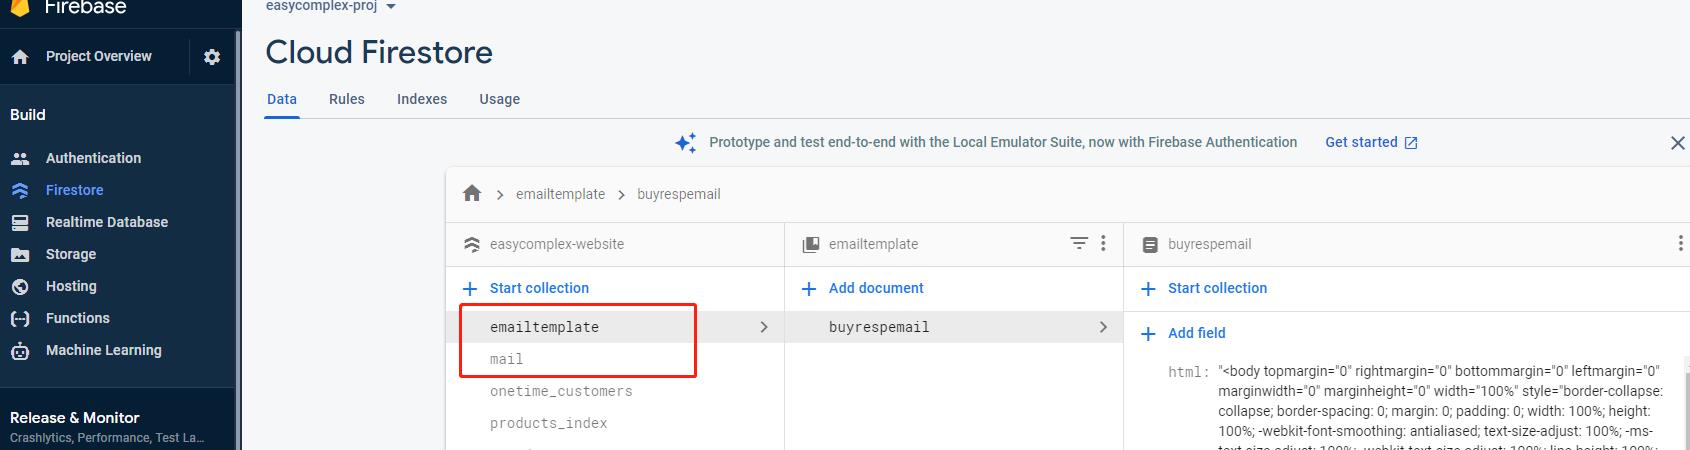
This exenstion will auto send email when you write the collection. In the demo project, two collections are used.
Use this extenstion, you also need a SMTP connenct URL. I am using Mailgun to do this.
5 Setup Firebase and Stripe Config
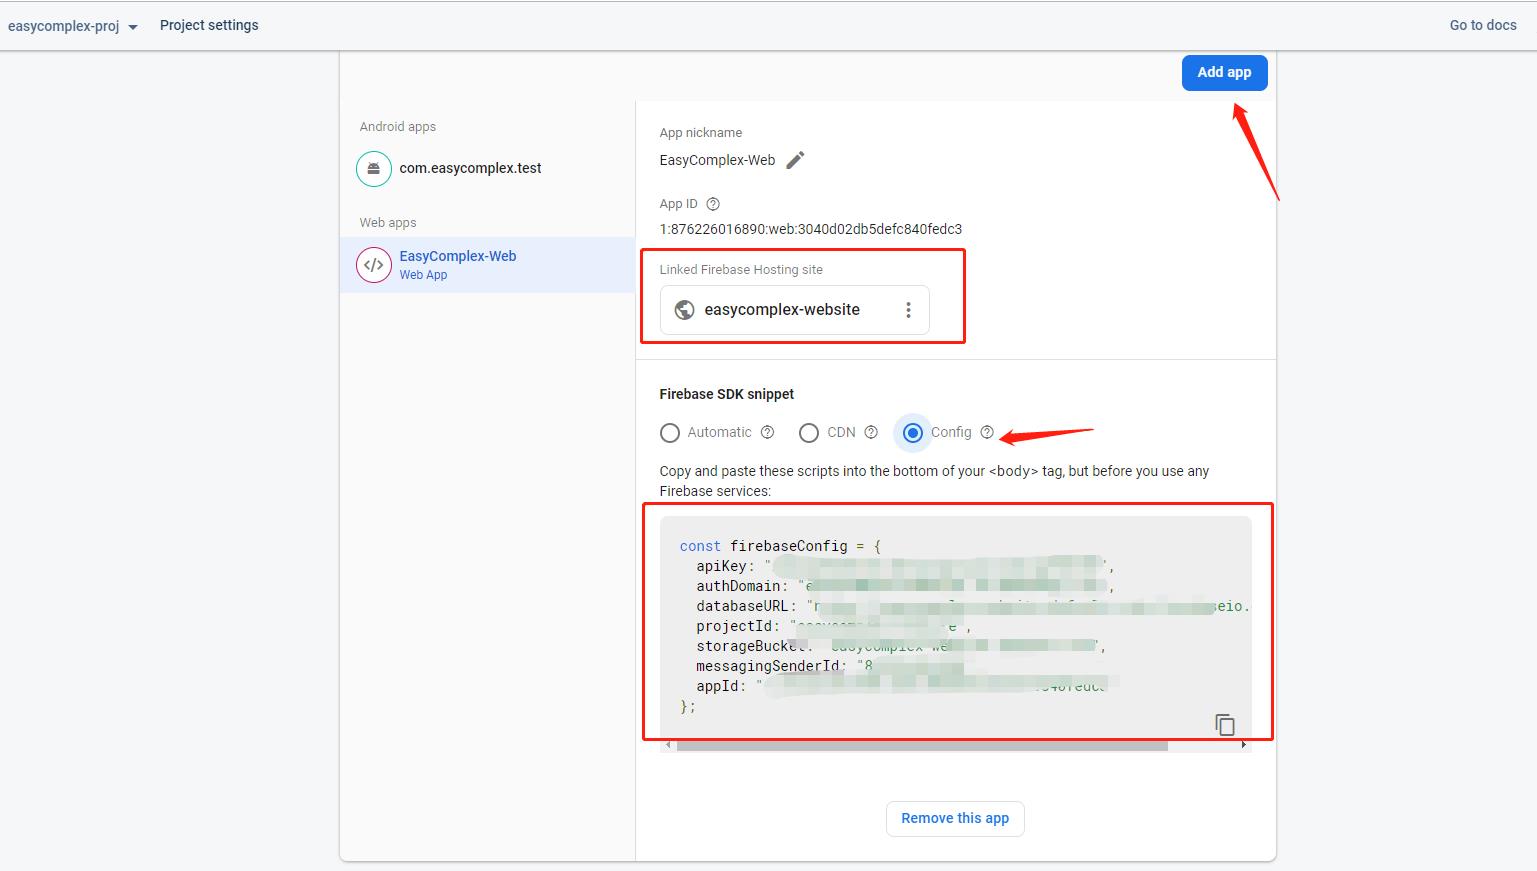
Modify webconfig.js
// Your web app's Firebase configuration
const firebaseConfig = {
apiKey: "***********************************",
authDomain: "easycomplex-website.firebaseapp.com",
databaseURL: "https://easycomplex-website-default-rtdb.firebaseio.com",
projectId: "easycomplex-website",
storageBucket: "easycomplex-website.appspot.com",
messagingSenderId: "********************",
appId: ""***********************************","
};
// Replace with your cloud functions location
const functionLocation = 'us-east1';
// Initialize Firebase
const firebaseApp = firebase.initializeApp(firebaseConfig);
const db = firebaseApp.firestore();
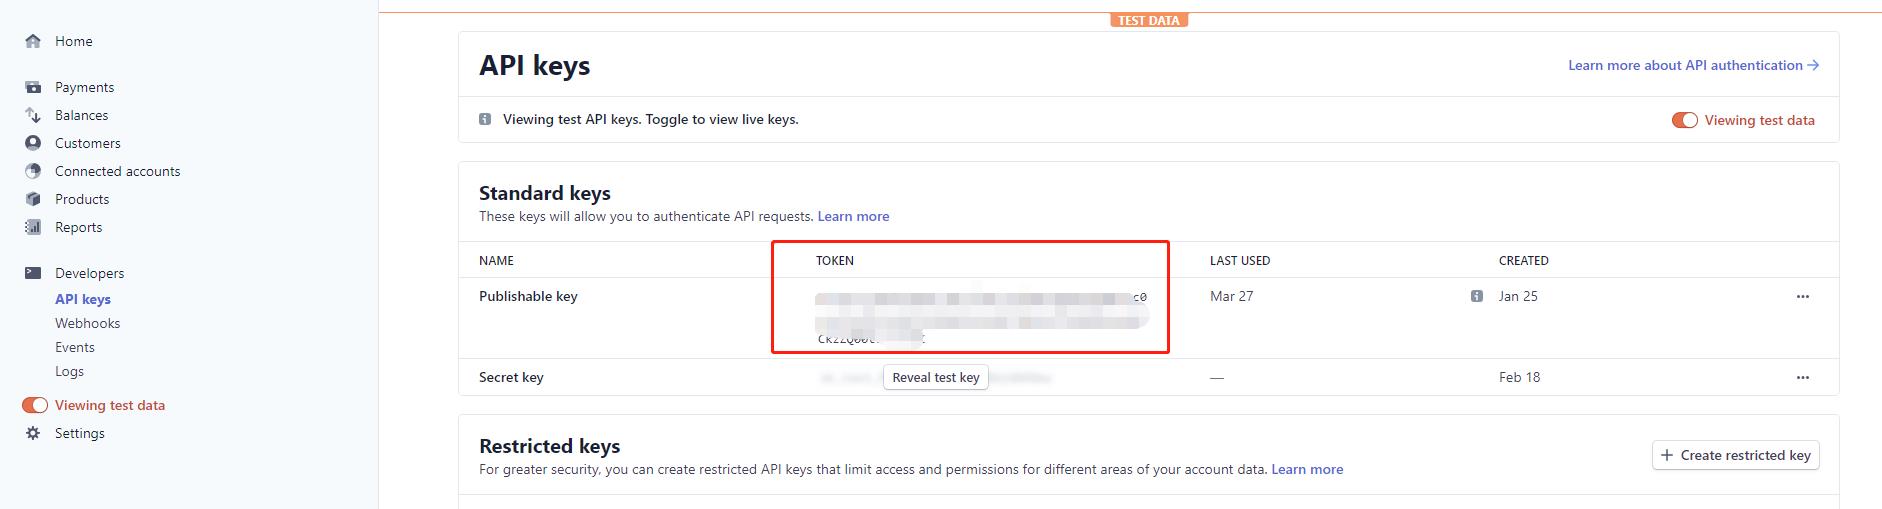
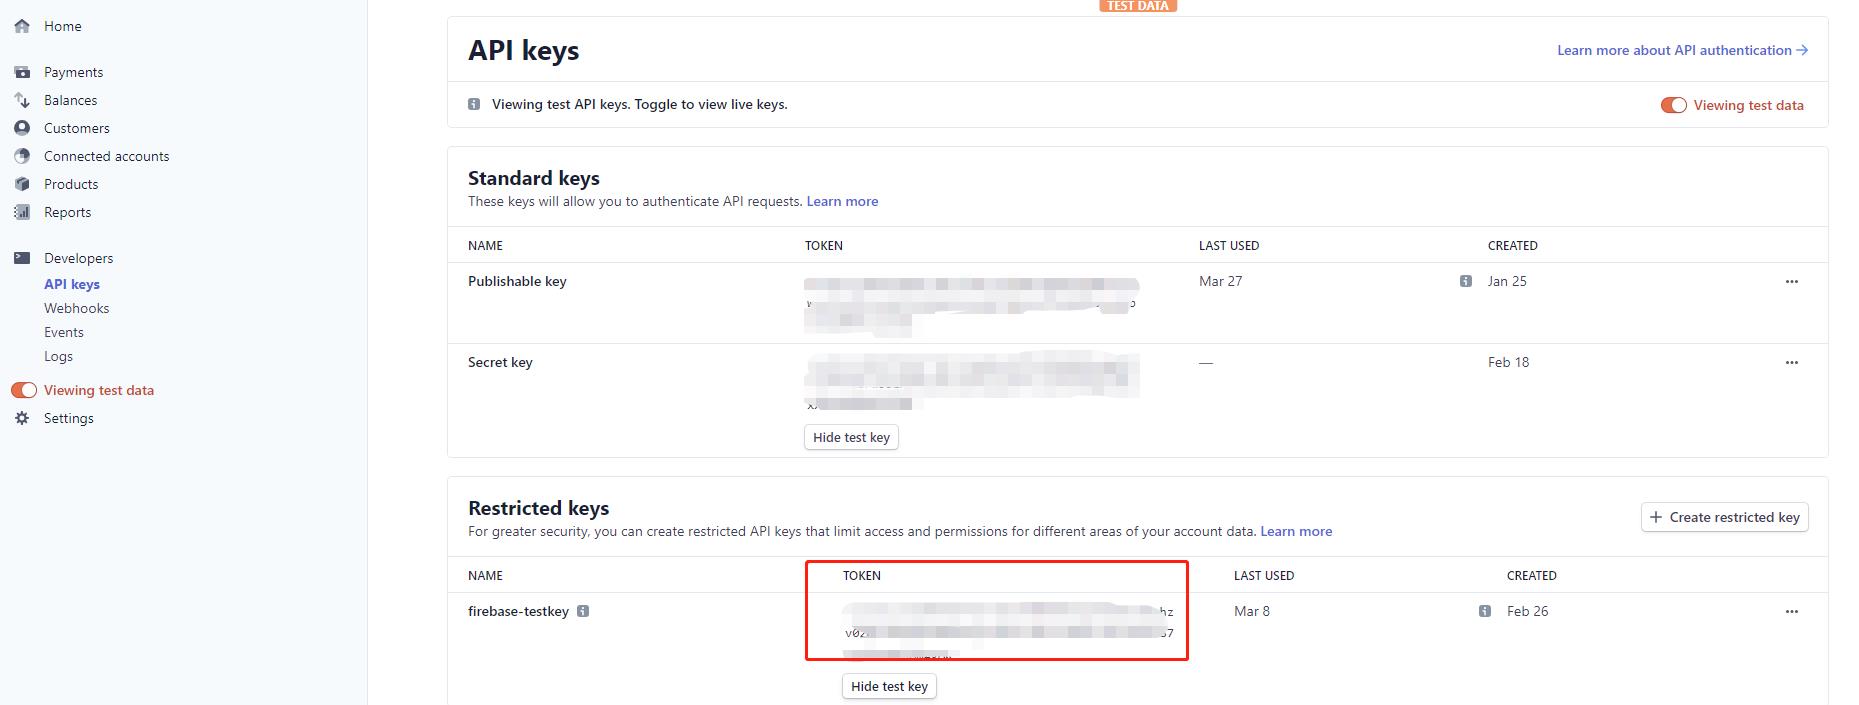
// https://dashboard.stripe.com/apikeys
const STRIPE_PUBLISHABLE_KEY = '************************';
const stripe = Stripe(STRIPE_PUBLISHABLE_KEY);
- Fetch firebaseConfig on Firebase Console:
- Fetch STRIPE_PUBLISHABLE_KEY on Stripe:
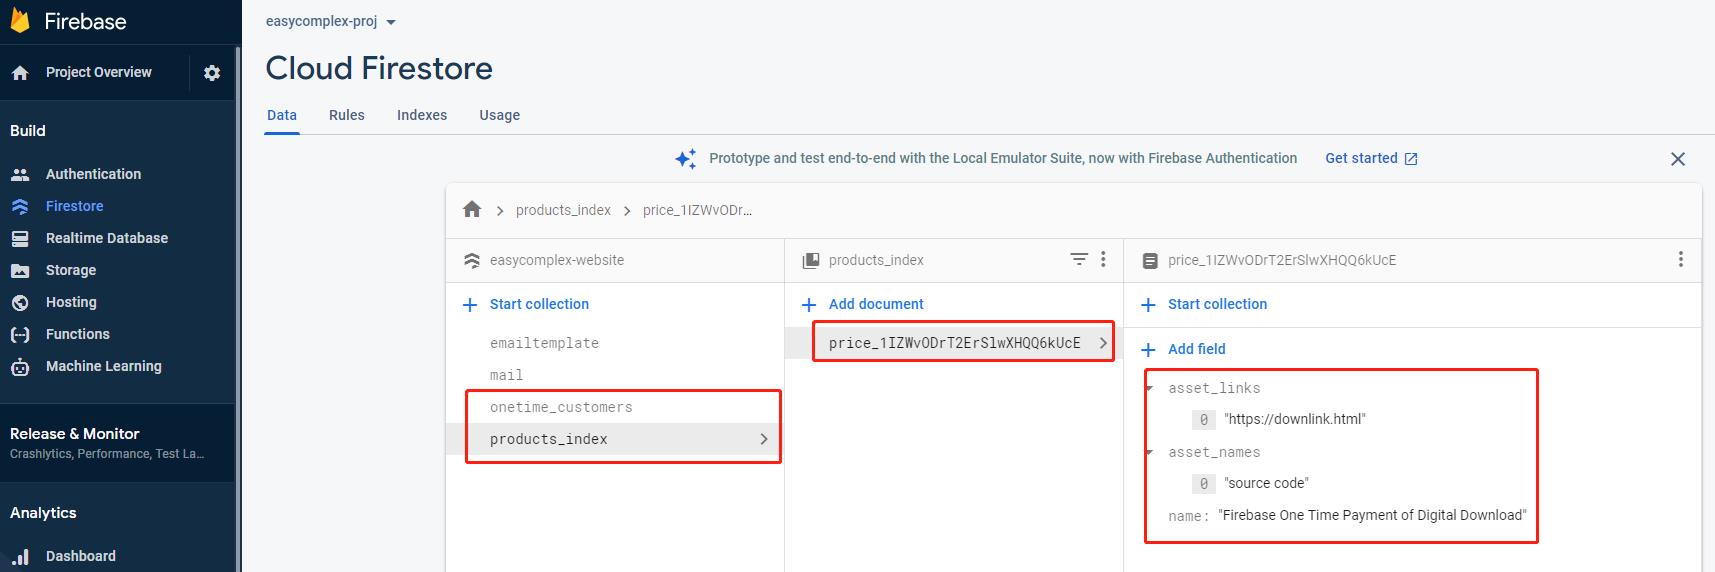
6 Setup Product and Customer Firestore
Add a product in the stripe dashboard
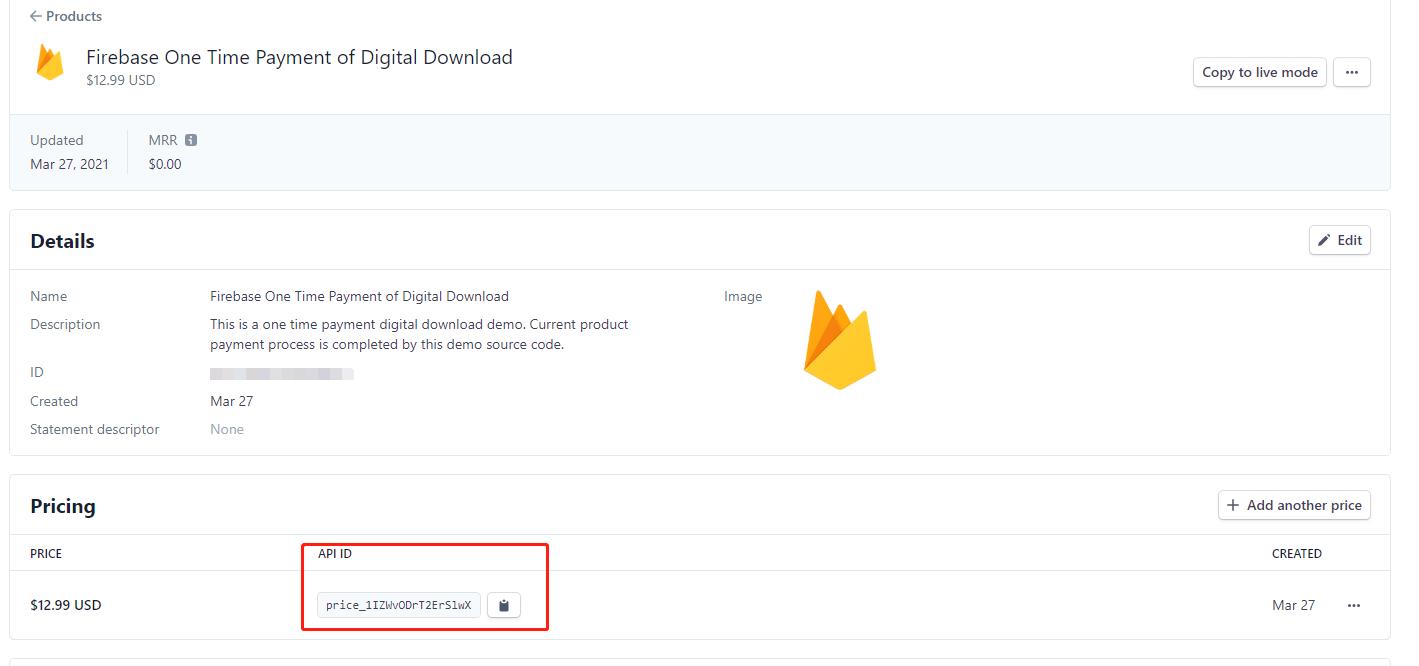
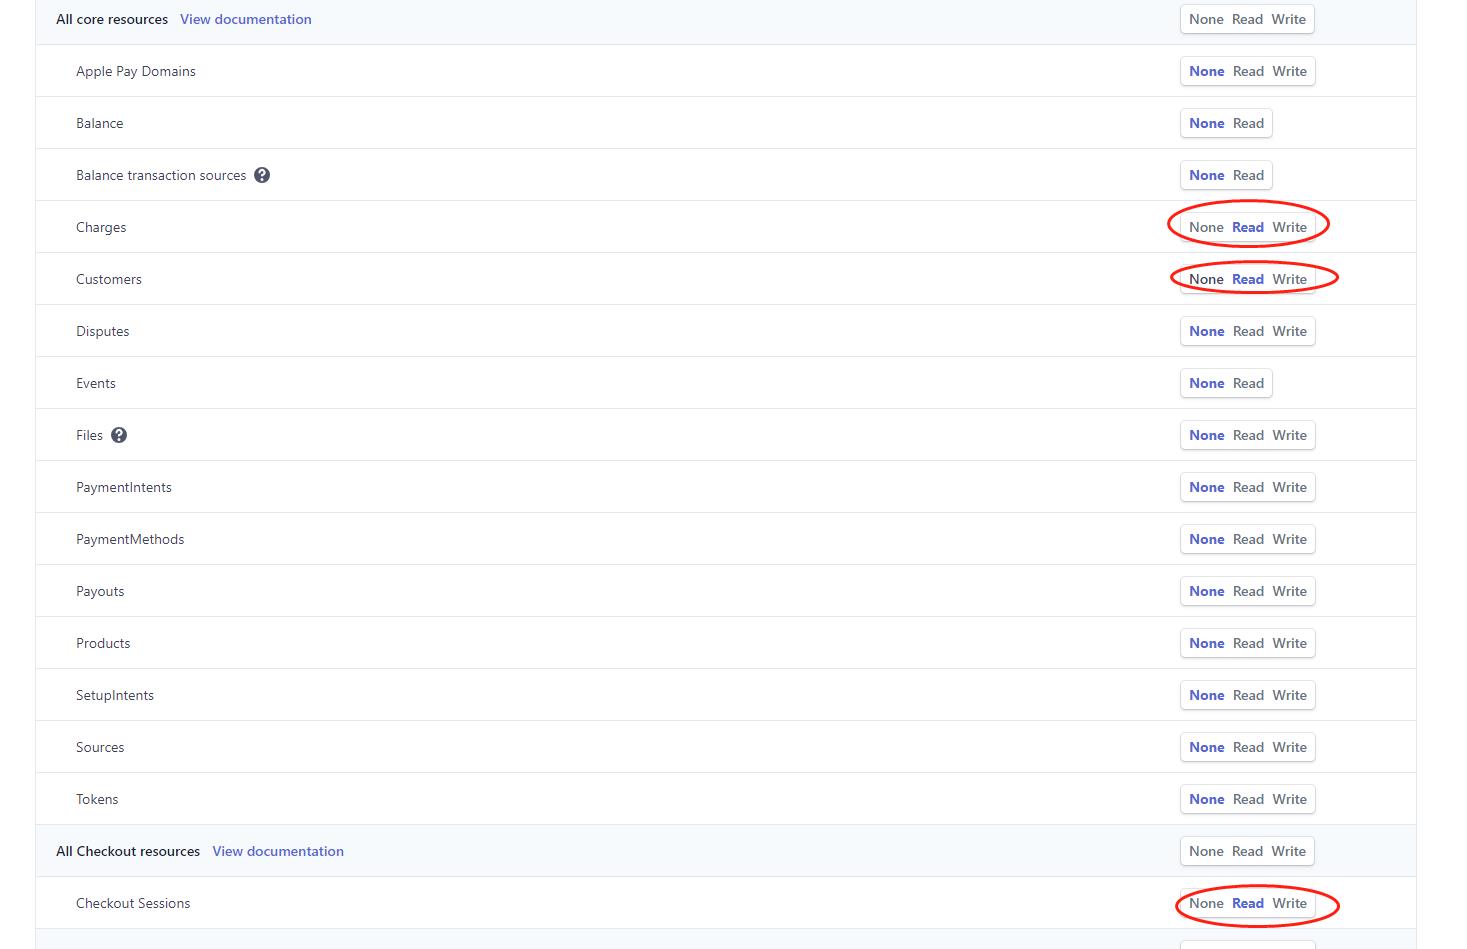
Enable the stripe client-only intergration setting.

Goto Firebase Console, add collection “onetime_customers” and “products_index” in Firestore. Add the stripe product (using above stripe proudct API ID ) into “products_index” collection as follow.
Using following security rules for your firestore.
-
Customer can only read their own record in the the “onetime_customers” collection.
-
Only product owner can read product detail in the “products_index” collection.
rules_version = '2';
service cloud.firestore {
  match /databases/{database}/documents {
    match /onetime_customers/{email} {
    	allow read: if request.auth.token.email == email;

      match /ownproducts/{id} {
      	allow read: if request.auth.token.email == email;
      }
    }
    match /products_index/{id} {
    	allow read: if request.auth != null && exists(/databases/$(database)/documents/onetime_customers/$(request.auth.token.email)/ownproducts/$(id));
    }

    match /mail/{uid} {
      allow read, write: if request.auth.uid == uid;
    }
  }
}
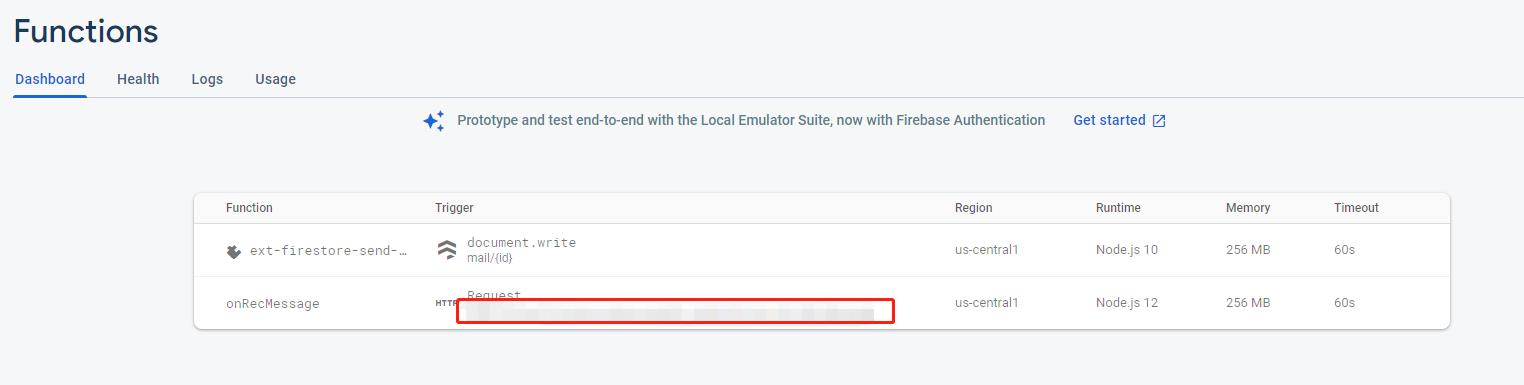
7 Deploy Firebase Cloud Function
While stripe checkout completed, customer data needs to be wrote back to firestore which will be completed by Cloud Function.
-
Run CLI tool and goto your project folder.
-
Using following commands:
> cd projectfolder
> firebase init functions
> cd functions
> npm install
> firebase functions:config:set stripe.secret="stripekey" stripe.hooksecret="webhookkey"
> firebase deploy --only functions
Fetch above “stripekey” in the stripe dashboard.
Fetch above “webhookkey” in the stripe dashboard as well.
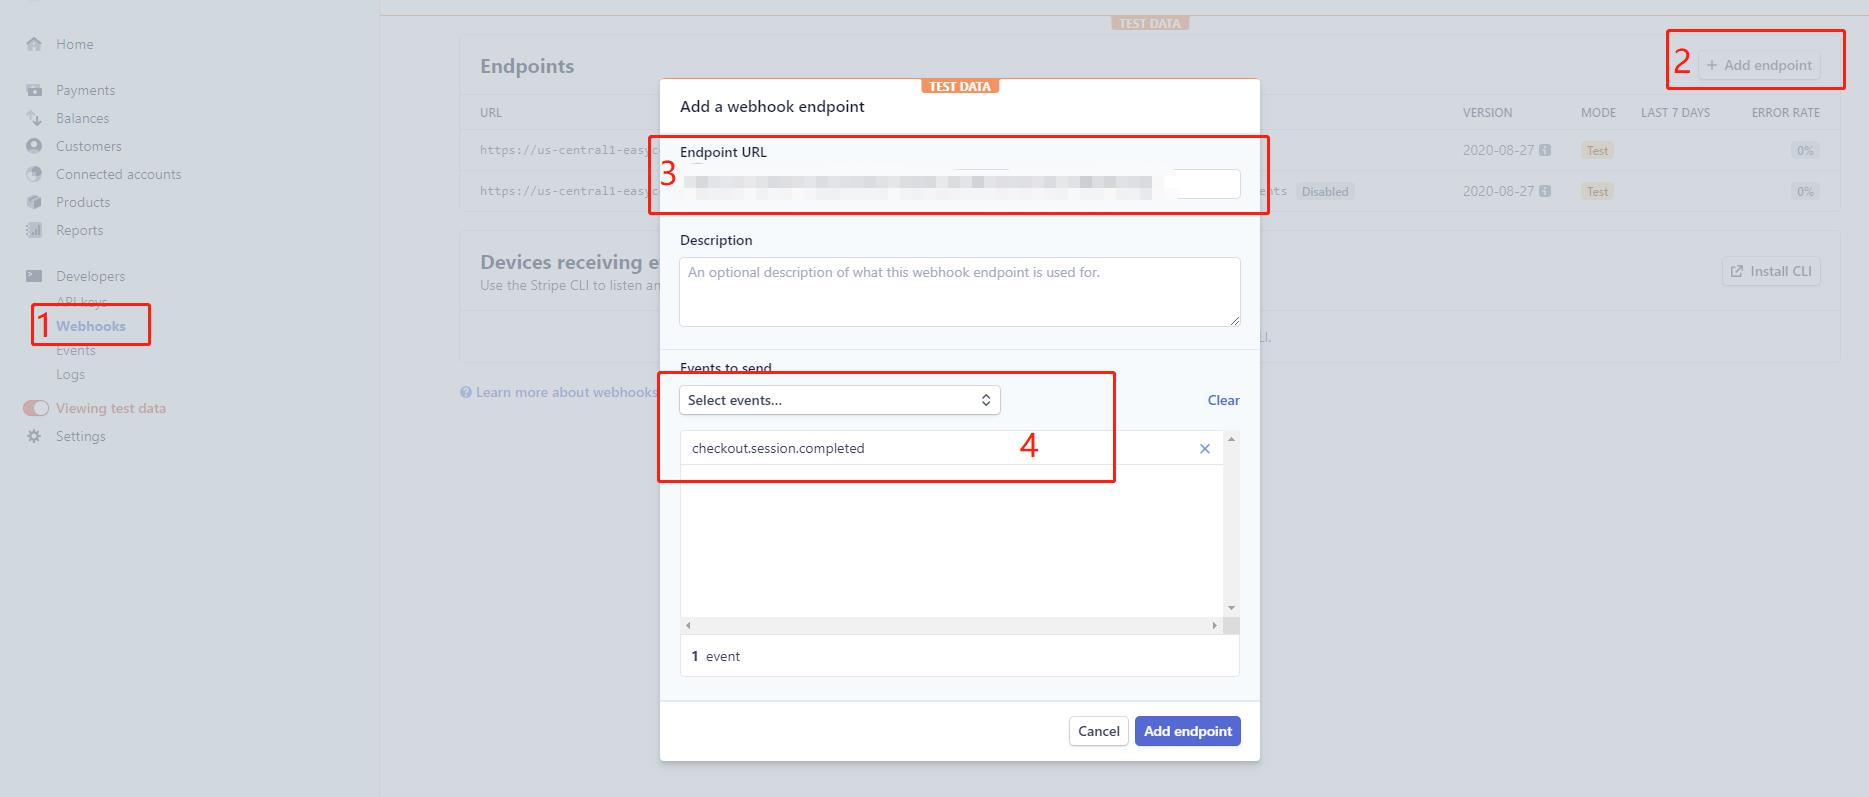
Notice you should update the above webhook endpoint url after cloud function deploy success in firebase. Using below link as your webhook endpoint url.
- If you want to host your website in firebase, using following command to deploy your website.
> firebase deploy --only hosting
8 Create Product Page
Create a html file as “checkout_onetimepayment.html” in the project folder. Replace following price id with your own product price id in in the stripe dashboard.
---
layout: checkout
---

  <script type="text/javascript">

    firebase.auth().onAuthStateChanged((firebaseUser) => {
      initCheckout(
        firebaseUser, //user
        'price_1IZqARDrT2ErSlwXTMS2K88z', //product price id
        'https://easycomplex-website.web.app/updateresource.html?id=price_1IZqARDrT2ErSlwXTMS2K88z', //pay successful jump to, fetch firebase data in this page
        'https://easycomplex-website.web.app/'  //cancel payment
        );
    });

  </script>
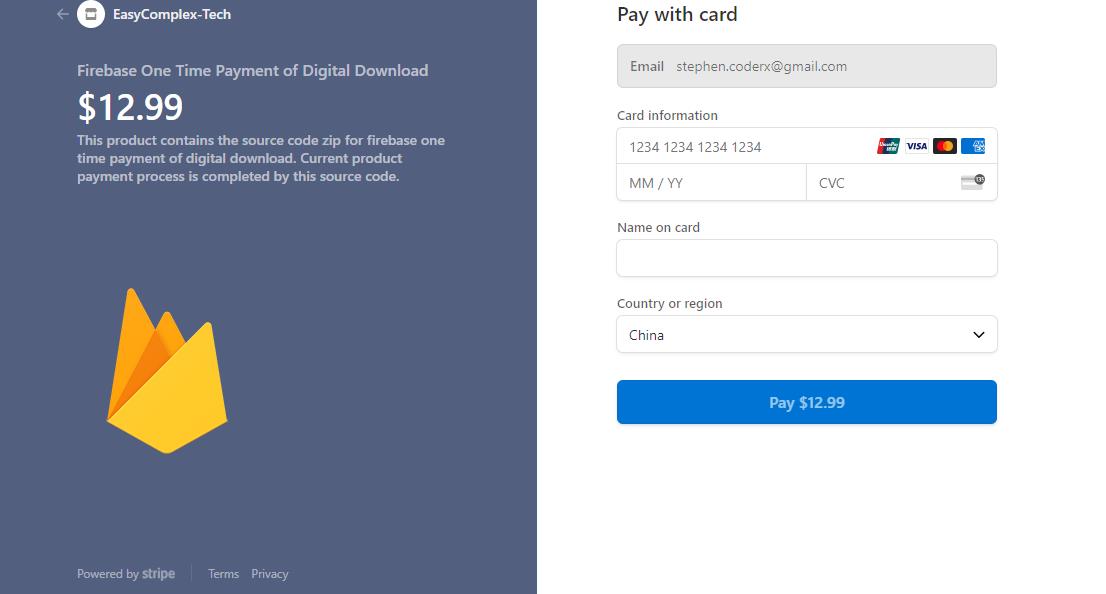
Let’s begin to reveive your payment on your own!

References
[1] Host your own blog with Jekyll on Firebase and Travis CI