1 Overview
Compact Login System is a plugin that provides the ability to login a web server with json. The plugin also provides the php code running in a web server using the sqlite database.
2 Introduction
Compact Login System is a simple plugin to setup a login system with web server. The plugin also provides the php code running in web server, including authorization code generation, compact user database(sqlite database). After you set up your own server and put the php code into web root folder, you will be able to use this comapct login system. As the comapct login system just contains limited user registration information, you may need to extend this part according to your own requirement in practice.
3 Quick Start
Following blew steps, you will use this tool quickly.
3.1 Setup Your Own Web Server or Local Test Server
First, you should setup your own web server.
For local test server, you can use WampServer or PhpStudy, which is quite easy to use.
3.2 Put PHP Code into Your Web Root
Put the php code into your web root folder.
The php code is in the Content folder of Compact Login System plugin.
3.3 Put the Login Manager Actor into Your Level
You should create an actor, derived from class ACompactLoginSystemMgr, and drag the actor into your level.
The example is given in folder Blueprints of the demo project.
3.4 Modify Web Server Address in Demo Project
You should set the ServerAddress to your own address in the blueprint BP_Login_UI and BP_Register_UI.
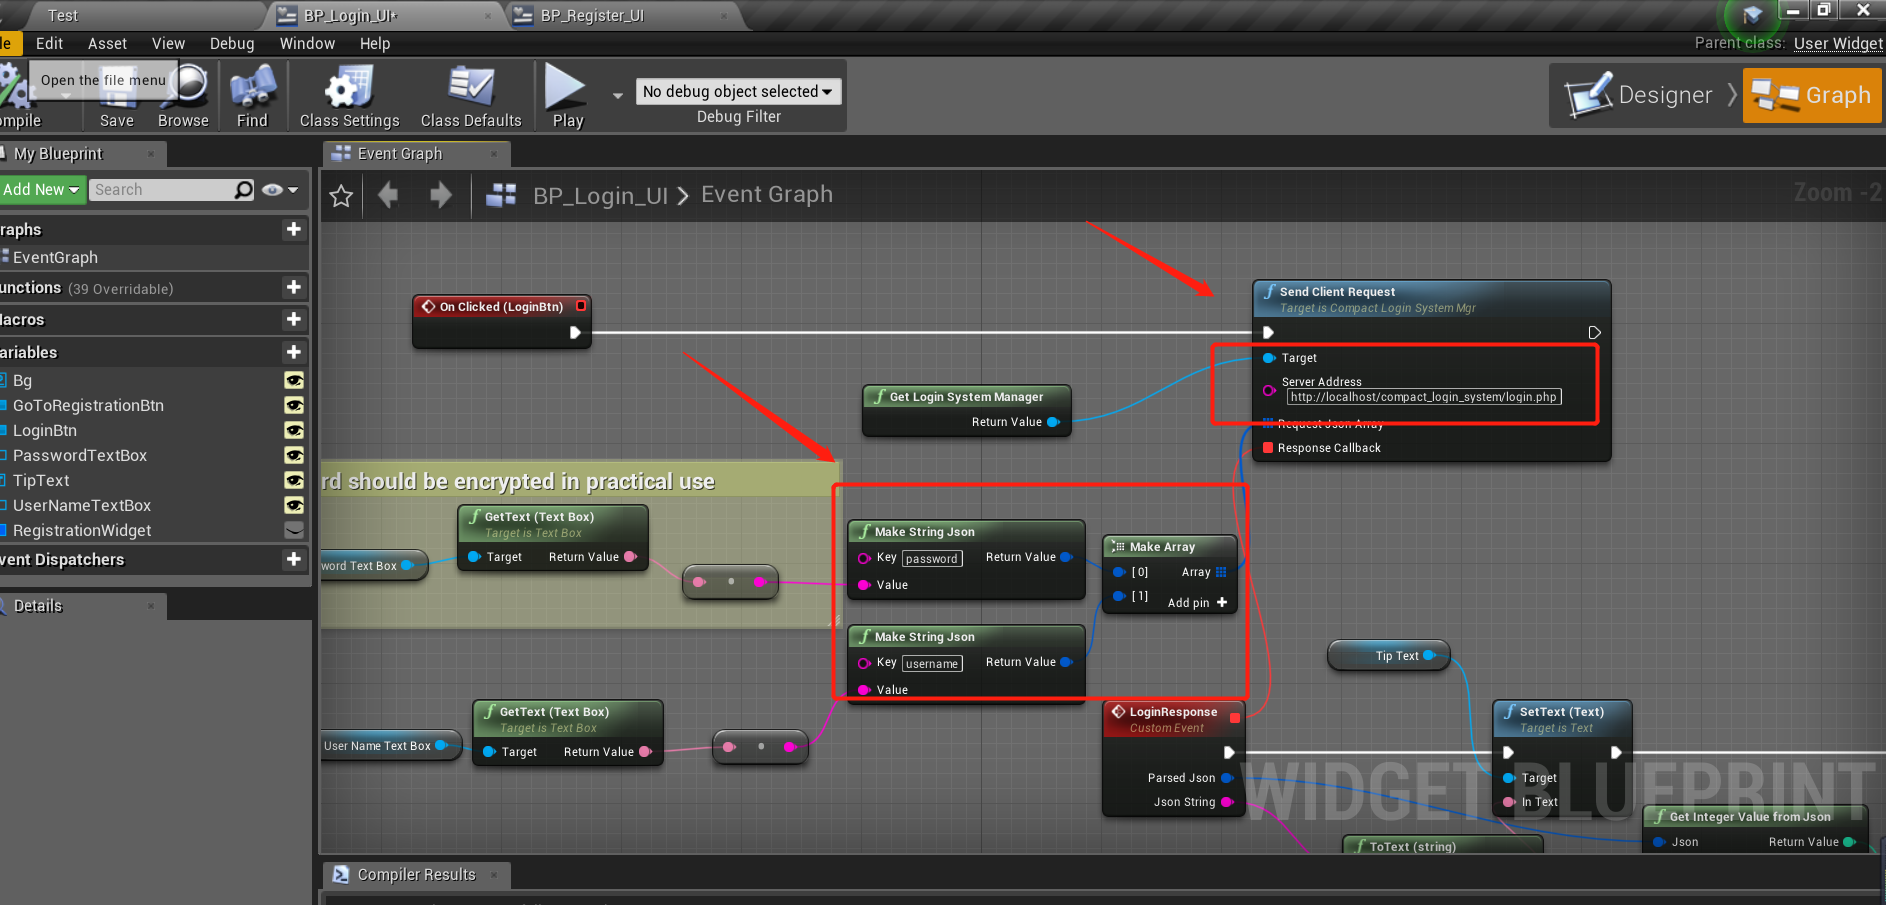
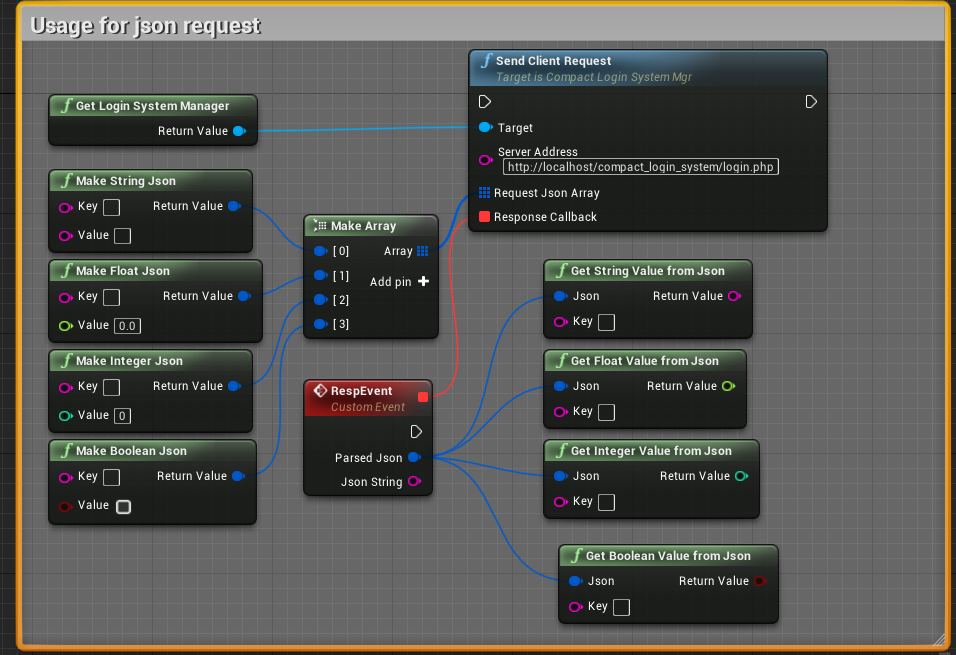
Notice that you can customize your json content that would be sent to web server, and parse value from responsed json by key name.
By the way, if you change the key names in the blueprints, you should modify the key names in php code as well.
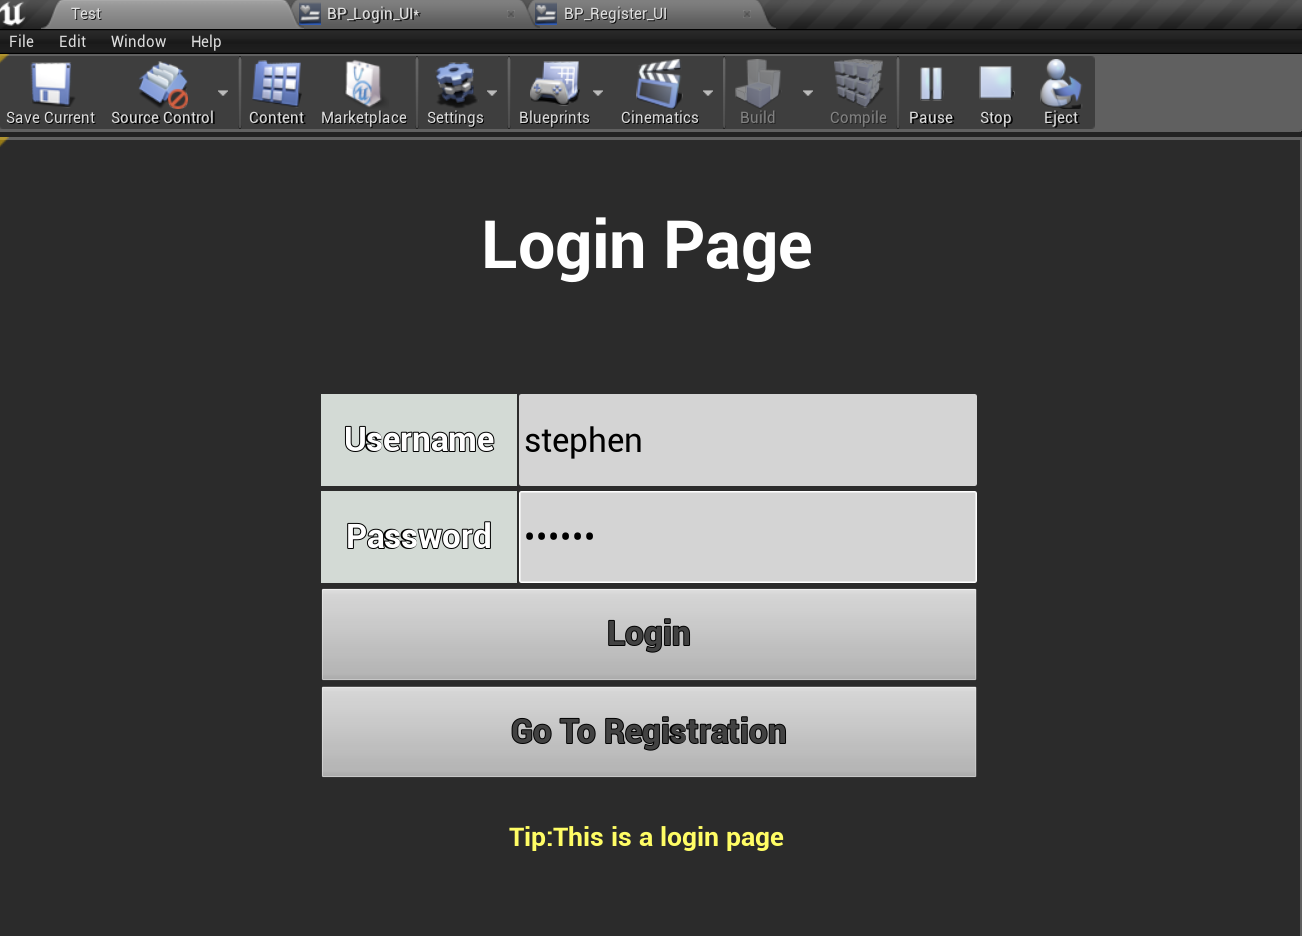
3.5 Run Demo Project
Finally, you can test your demo as follow.
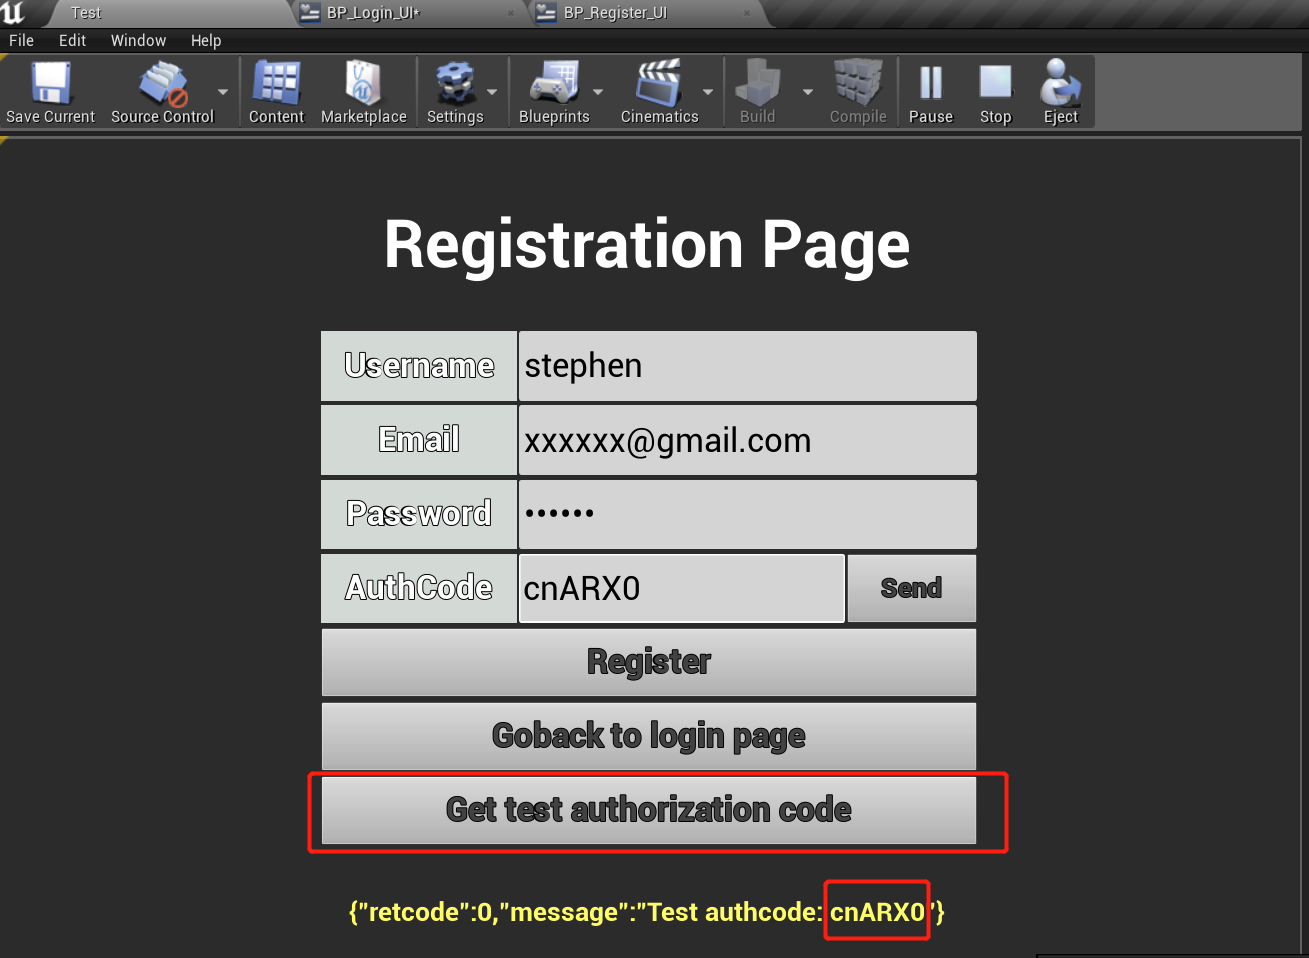
For registration, if you haven’t setup a mail server yet, you can click “Get test authorization code” to get a test authorization code.
4 Setup a Linux Web Server with PHP and Sqlite
The demo has been tested in a linux server, the steps to setup a linux server are given below.
4.1 Setup Lighttpd
- yum install lighttpd
- yum install lighttpd-fastcgi
4.2 Setup Sqlite
- yum install sqlite
4.3 Setup Php
- yum install php5 php5-cgi php5-common php-pear php5-sqlite php5-dev
- yum install php-pdo
- yum install php-pdo_sqlite (php-pdo_mysql)
4.4 Add Root Folder
- mkdir /home/lighttpd
- mkdir wwwroot
- mkdir wwwroot/cgi-bin
- mkdir wwwroot/databases
- mkdir wwwroot/images
- mkdir log
Modify privilege:
- chown -R lighttpd:lighttpd /home/lighttpd
4.5 Modify /etc/lighttpd/lighttpd.conf
Modify the content in lighttpd.conf as follow.
var.log_root    = "/home/lighttpd/log"
var.server_root = "/home/lighttpd"
var.state_dir   = "/home/lighttpd"
var.home_dir    = "/home/lighttpd"
var.conf_dir    = "/etc/lighttpd"

debug.log-request-handling = "enable"
var.cache_dir   = "/home/lighttpd/cache"
server.use-ipv6 = "disable"
server.username  = "lighttpd"
server.groupname = "lighttpd"
server.document-root = server_root + "/wwwroot"
#server.tag = "lighttpd"

#server.pid-file = state_dir + "/lighttpd.pid"

server.errorlog             = log_root + "/error.log"


#include "conf.d/access_log.conf"
#include "conf.d/debug.conf"
#server.network-backend = "linux-sendfile"

#$HTTP["url"] =~ "\.pdf$" {
#  server.range-requests = "disable"
#}

server.upload-dirs = ( "/home/lighttpd/tmp" )
4.6 Modify /etc/php.ini
 extension=pdo.so
 extension=pdo_sqlite.so
 extension=pdo_mysql.so
 extension=sqlite.so
4.7 Modify /etc/lighttpd/modules.conf
Delete ‘#’ in the below line:
#include fastcgi.conf
4.8 Modify /etc/lighttpd/conf.d/fastcgi.conf
fastcgi.server = ( ".php" =>
                   ( "php-local" =>
		    (
                       "socket" =>   "/tmp/php-fastcgi-1.socket",
                       "bin-path" =>  "/usr/bin/php-cgi",
                       "max-procs" => 1,
                       "broken-scriptfilename" => "enable",
                     ),
                     "php-tcp" =>
                     (
                       "host" => "127.0.0.1",
                       "port" => 9999,
                       "check-local" => "disable",
                       "broken-scriptfilename" => "enable",
                     ),
                     "php-num-procs" =>
                     (
                       "socket" => "/tmp/php-fastcgi-2.socket",
                       "bin-path" => "/usr/bin/php-cgi",
                       "bin-environment" => (
                         "PHP_FCGI_CHILDREN" => "16",
                         "PHP_FCGI_MAX_REQUESTS" => "10000",
                       ),
                       "max-procs" => 5,
                       "broken-scriptfilename" => "enable",
                     ),
                   ),
                 )
4.9 Start or Close Web Server
Start server with command:
- lighttpd -f /etc/lighttpd/lighttpd.conf
Close server with command:
- killall lighttpd
4.10 Test Html
Create index.html with following content:
<html>
<head>
<meta http-equiv="Content-Type" content="text/html; charset=UTF-8">
<title>Test Page</title>
</head>
<body>
<p>Hellow world</p>
<hr>
<p>Test</p>
</body>
</html>
Enter your server address in the Chrome to visit your page.
4.11 Send Email with PHP
You can setup your own mail server or use the existing production, such as Mailgun.
Here, we use mailgun server to send email and you can register in the Mailgun Page
Setup your mailx in linux with command:
- yum install mailx
Add following content in mail.rc:
-
vi /etc/mail.rc
  set from=from@gmail.com
  set smtp=smtp.mailgun.org
  set smtp-auth-user=postmaster@your_domain_name
  set smtp-auth-password=*****
  set smtp-auth=login
  set ssl-verify=ignore
  set nss-config-dir=/root/.certs
Test using following command:
- echo “Test Content” | mail -s “Subject” ***@gmail.com
5 FAQ
5.1 Sqlite3 Command
-
Enter DB:
sqlite3 dbname -
Show table content:
  .header on
  .mode column
  select * from “tablename”;
5.2 PHP Time Zone
- date_default_timezone_set(‘PRC’)
6 Support
In the event you are unable to find the information you seek, feel free to contact easycomplex.tech@gmail.com.