Compact User Hosting Service
1 Introduction
Compact User Hosting Service provides the ability to save and modify user data conveniently. With this service, you can easily add, get, update or delete user data with one function call. Also, you can use this service to send verification email or get remote config for your application. This service provides the client API and an administration website to operate all users data.
-
Support to add user data from blueprint.
-
Support to update user data from blueprint.
-
Support to delete user data from blueprint.
-
Support to get user data from blueprint.
-
Support to send verification email from blueprint.
-
Support to customize email content and set verification code length.
-
Support to set source or reply email address, such as noreply@exmaple.com.
-
Support to get remote config from blueprint.
-
Support to operate user data from an administration website (Menu > Service > User Hosting).
-
Seven days trial for a new user.
2 Guide for Administrator
Open the administration website here.
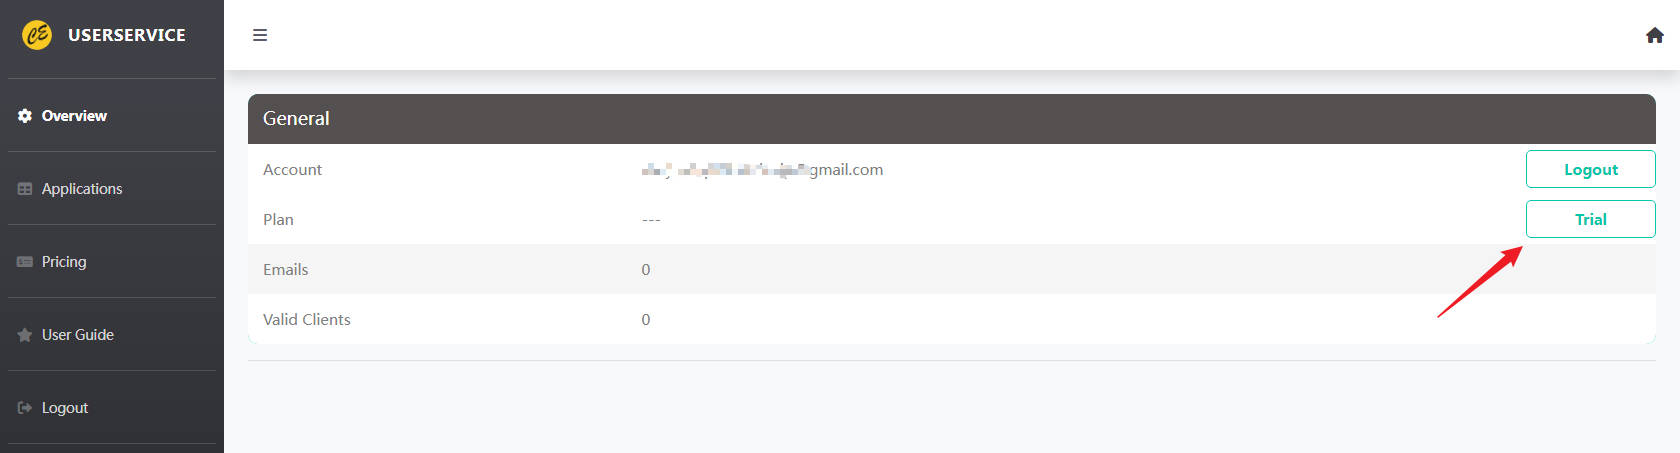
2.1 Activate Account
Goto “Overview” page and click Trial button to activate your account.
2.2 Add Application
Goto “Applications” page and click + button to add your application.
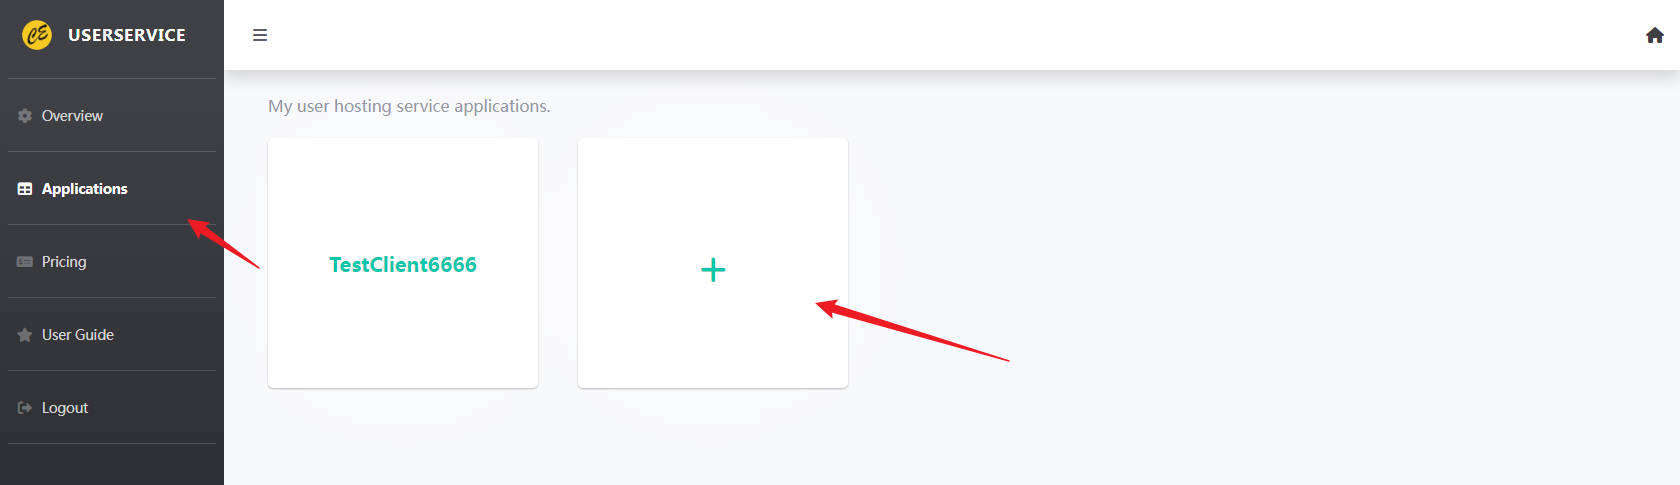
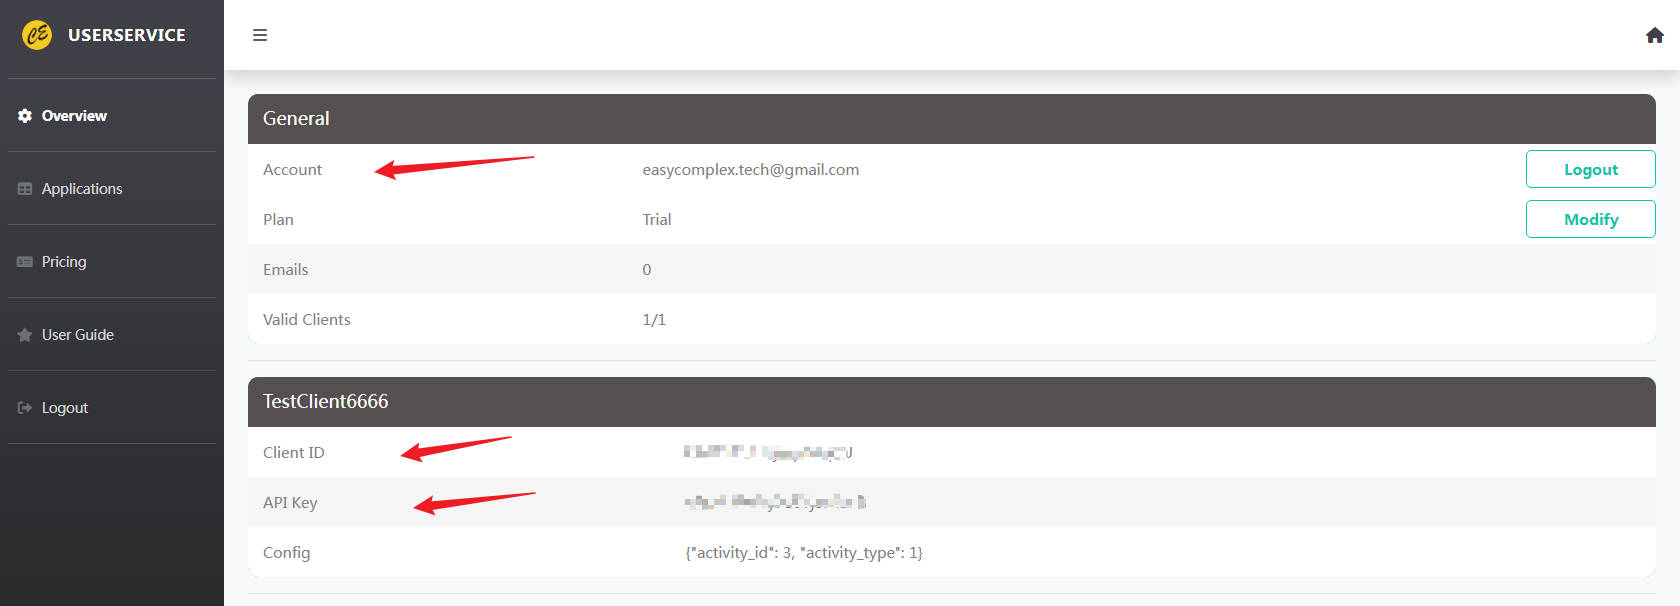
After saving the application, you will get the ClientID and APIKey which will be used in client API.
2.3 Operate Application
Goto “App Config” tab to change the name and remote config for your application.
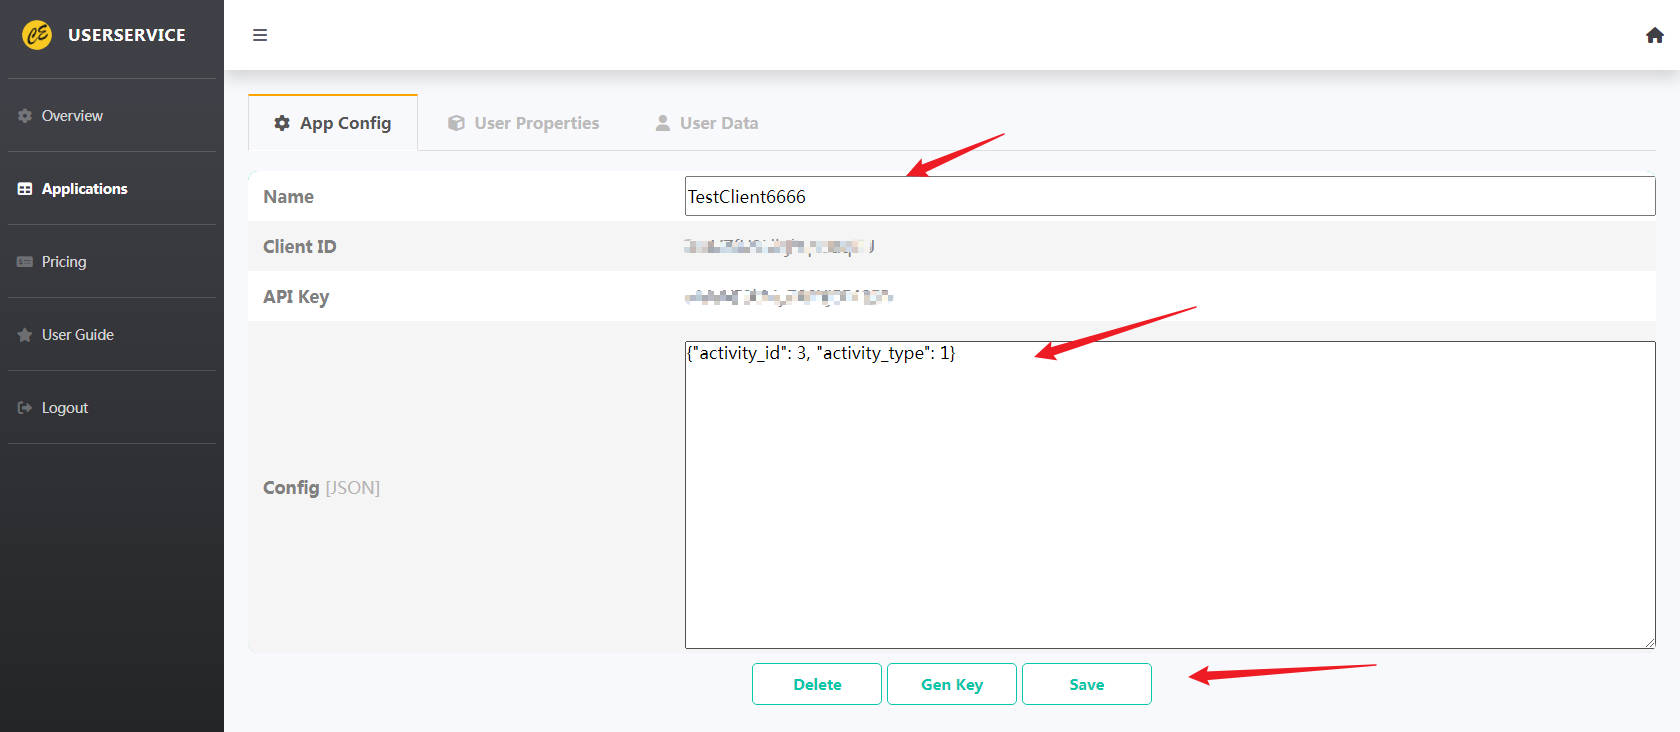
Notice that the config json here can be fetched from client and you can modify this config for your published application online.
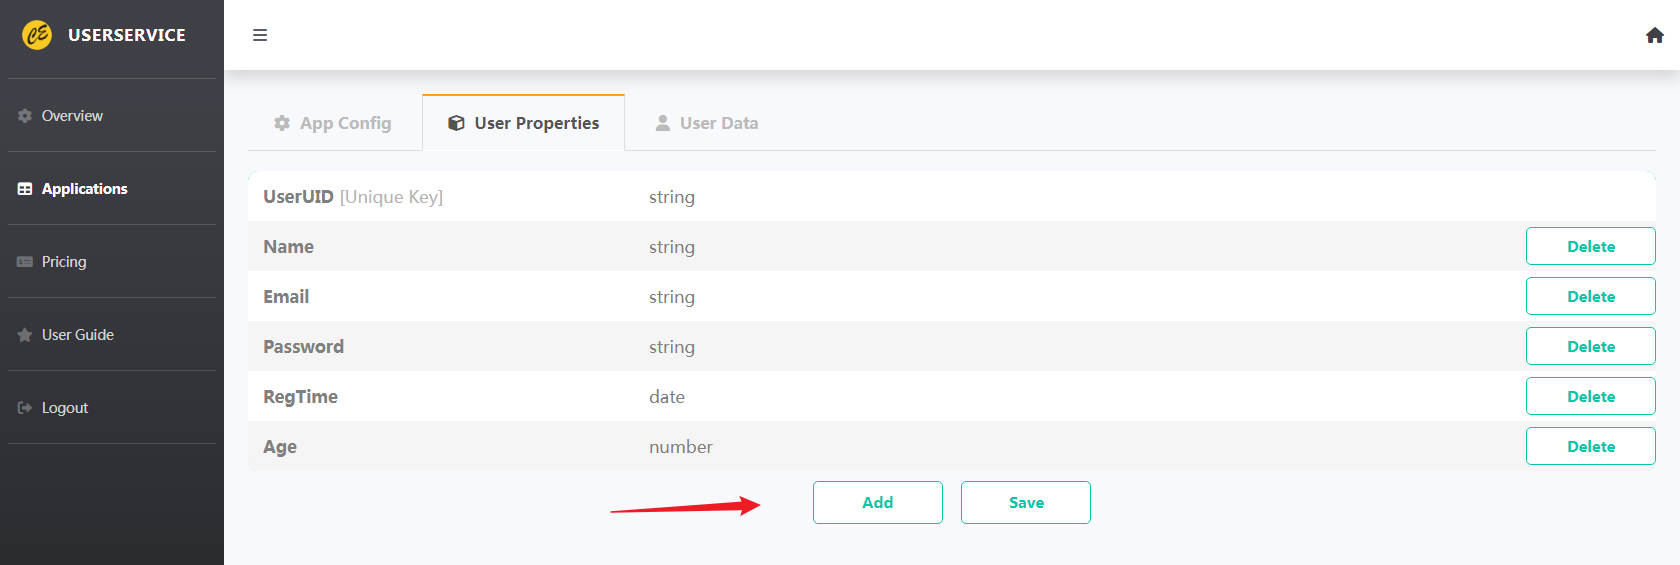
Goto “User Properties” tab to add user properties for your application.
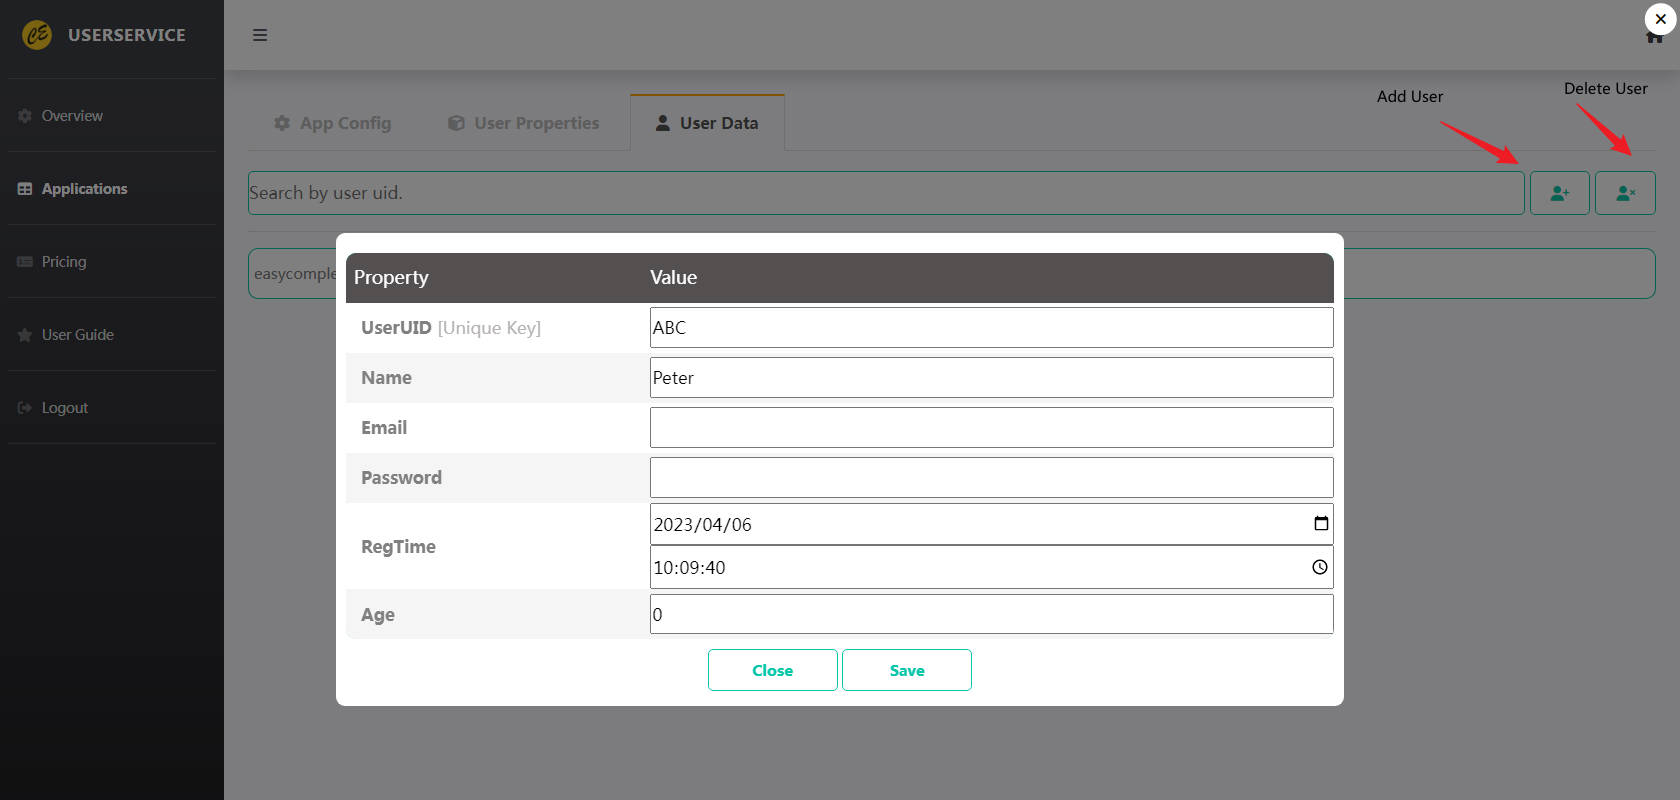
2.4 Operate User Data
Goto “User Data” tab to add, delete and get your user data.
3 Guild for Client API
Following blew steps, you will use this tool quickly.
3.1 Setup Proxy
Drag UserHostingServiceProxy into your persistent level.
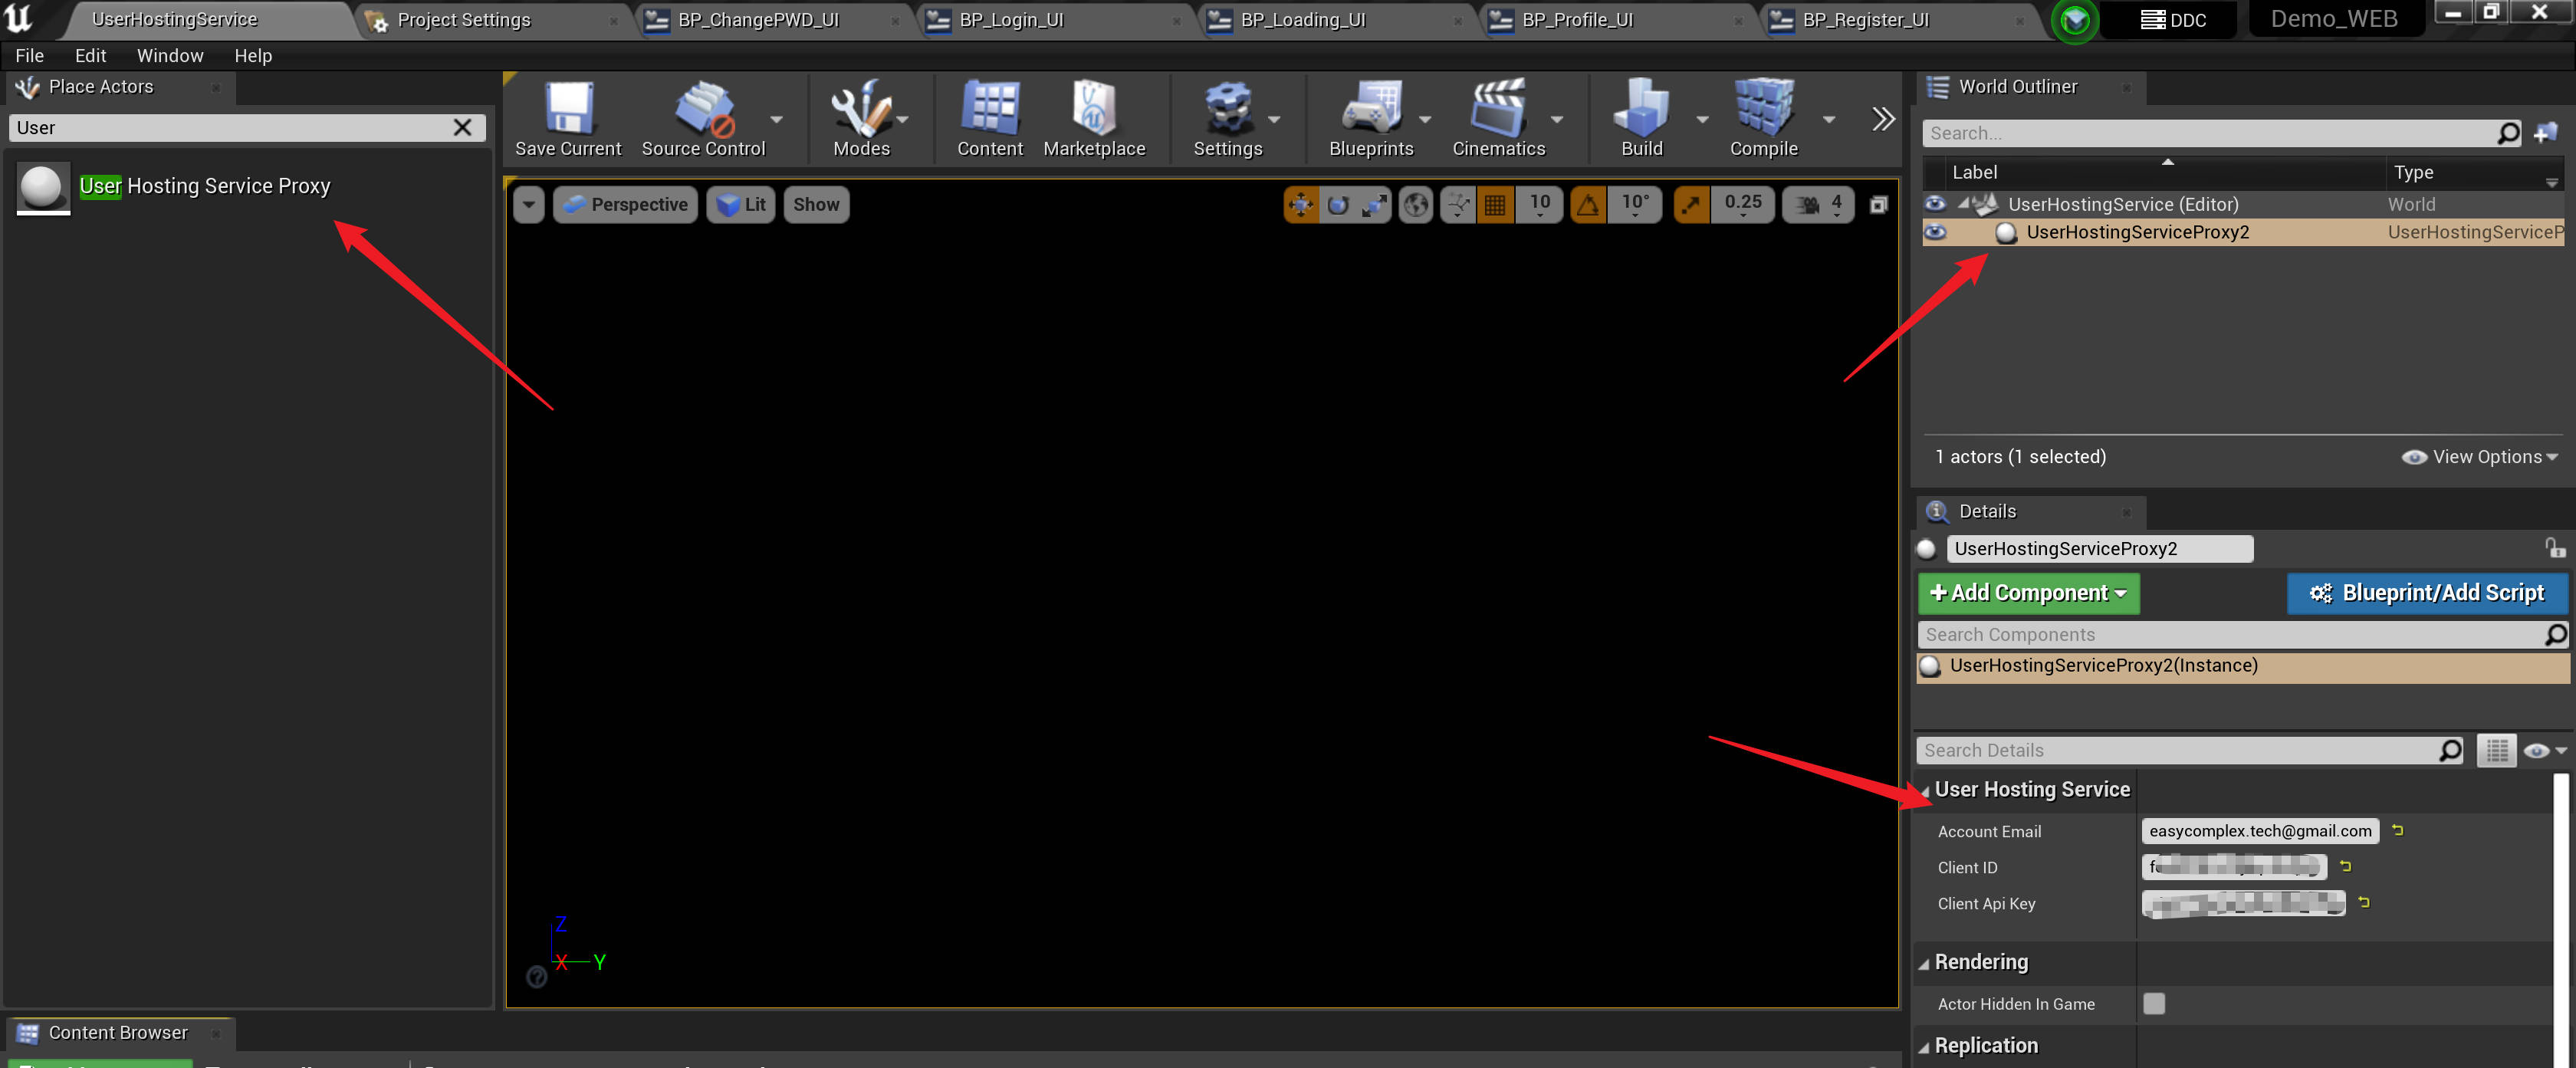
Get ClientID and API Key from section 2.2.
3.2 Client API Functions
Use GetUHSManager interface to get user hosting service manager.
3.2.1 Add User
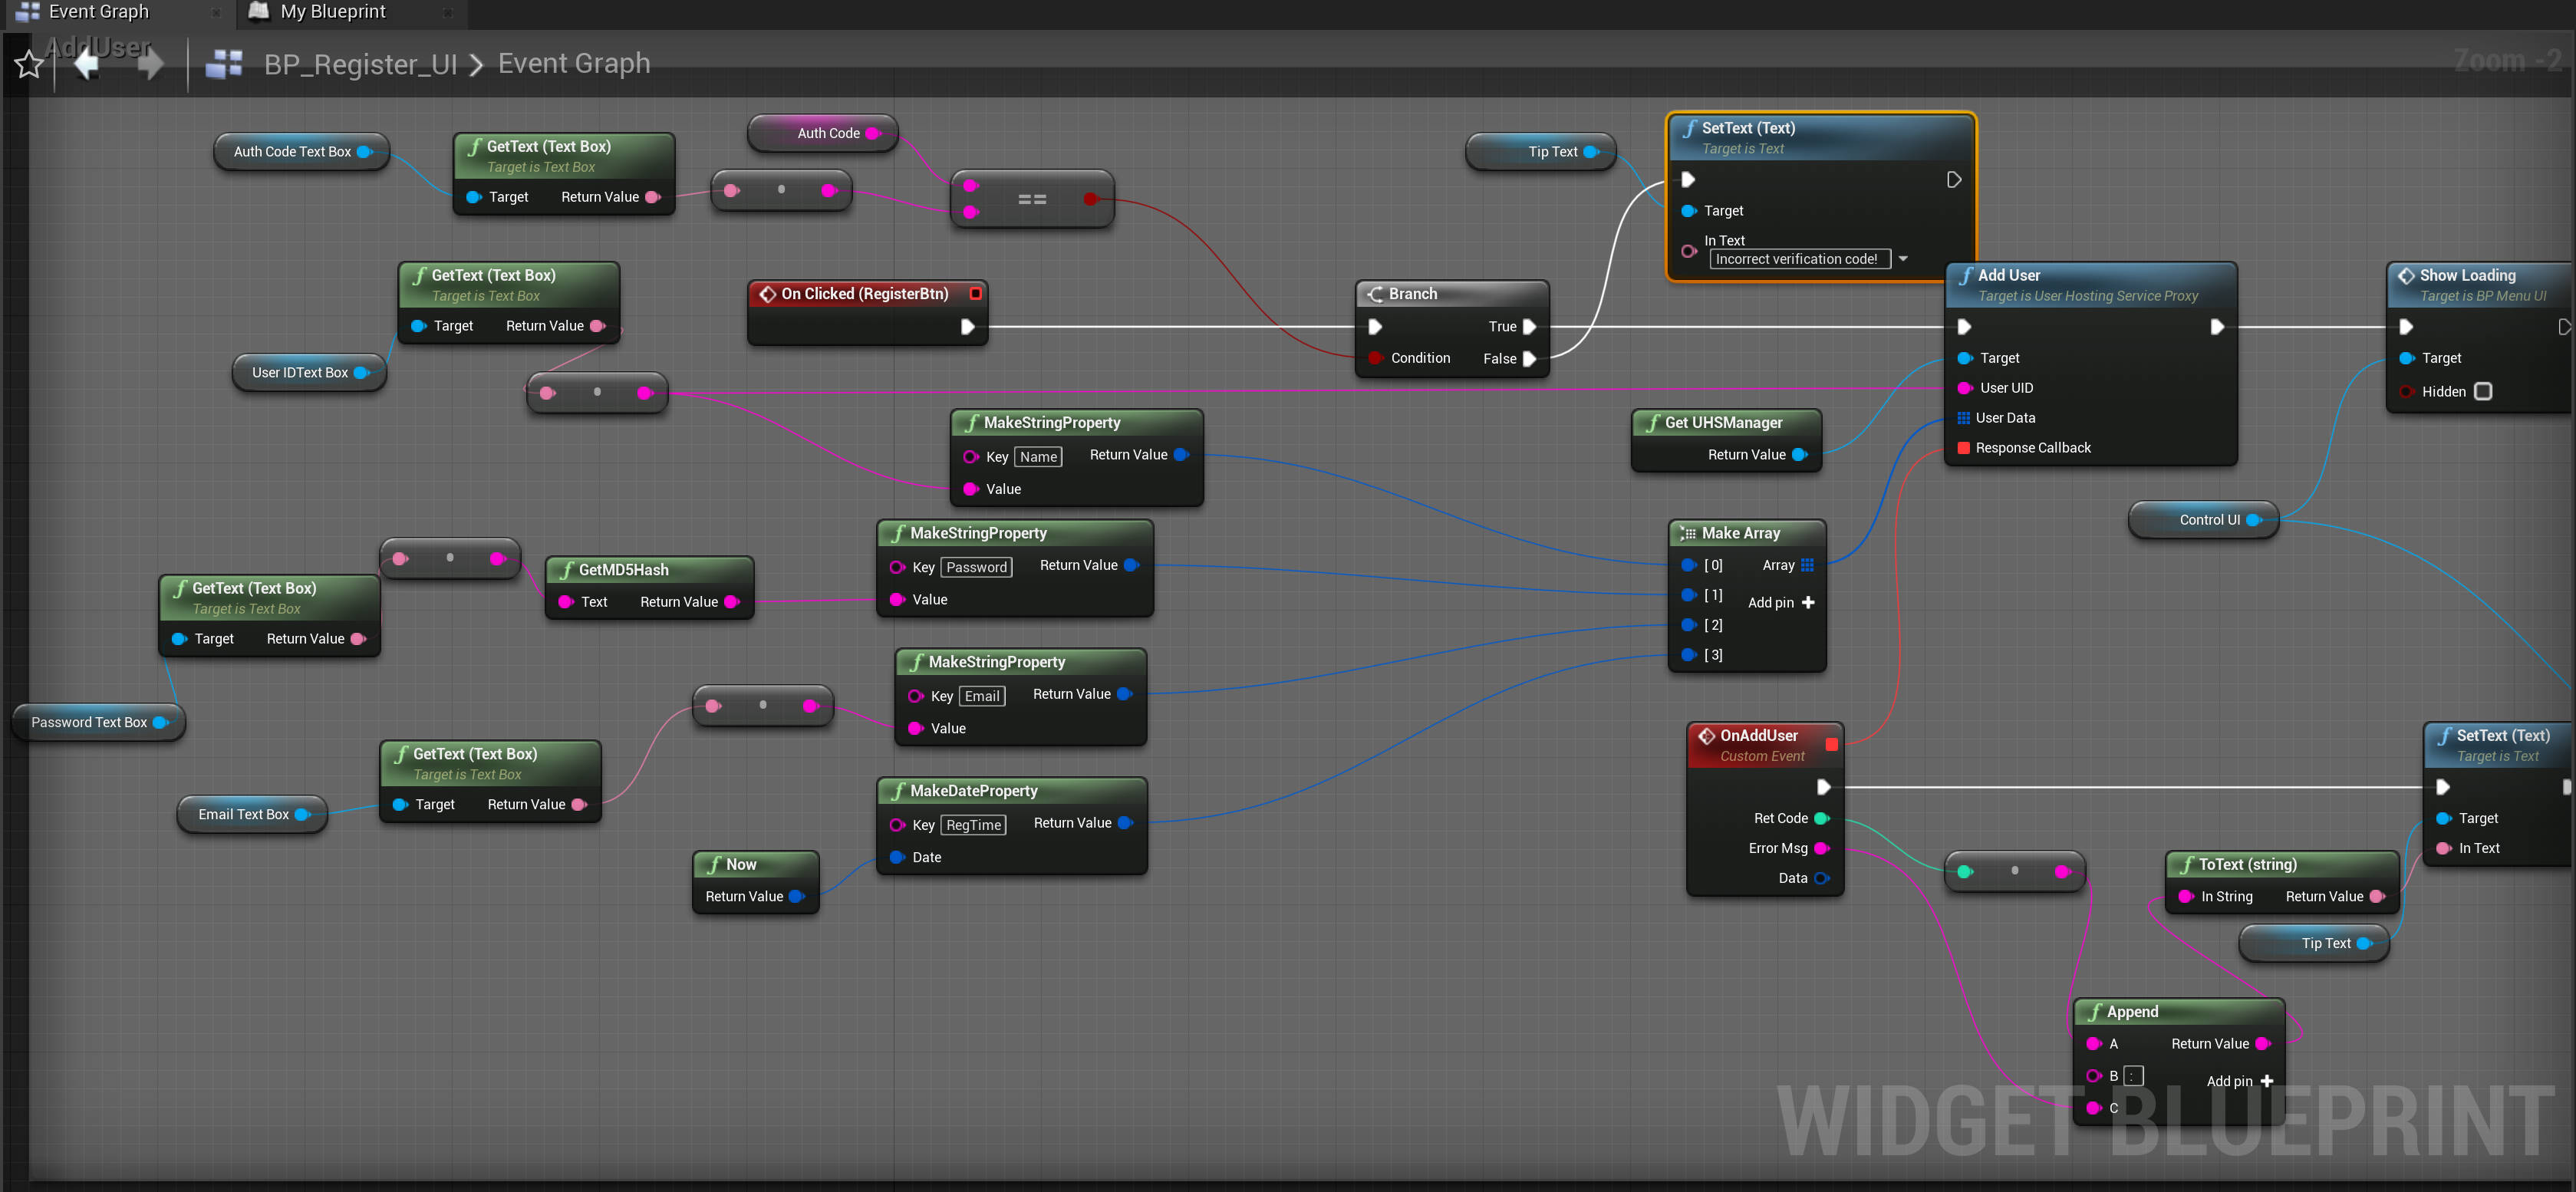
Open demo project and see the example from blueprint BP_Register_UI. Use AddUser interface of UHSManager to add an user, as follow.
3.2.2 Fetch and Update User Data
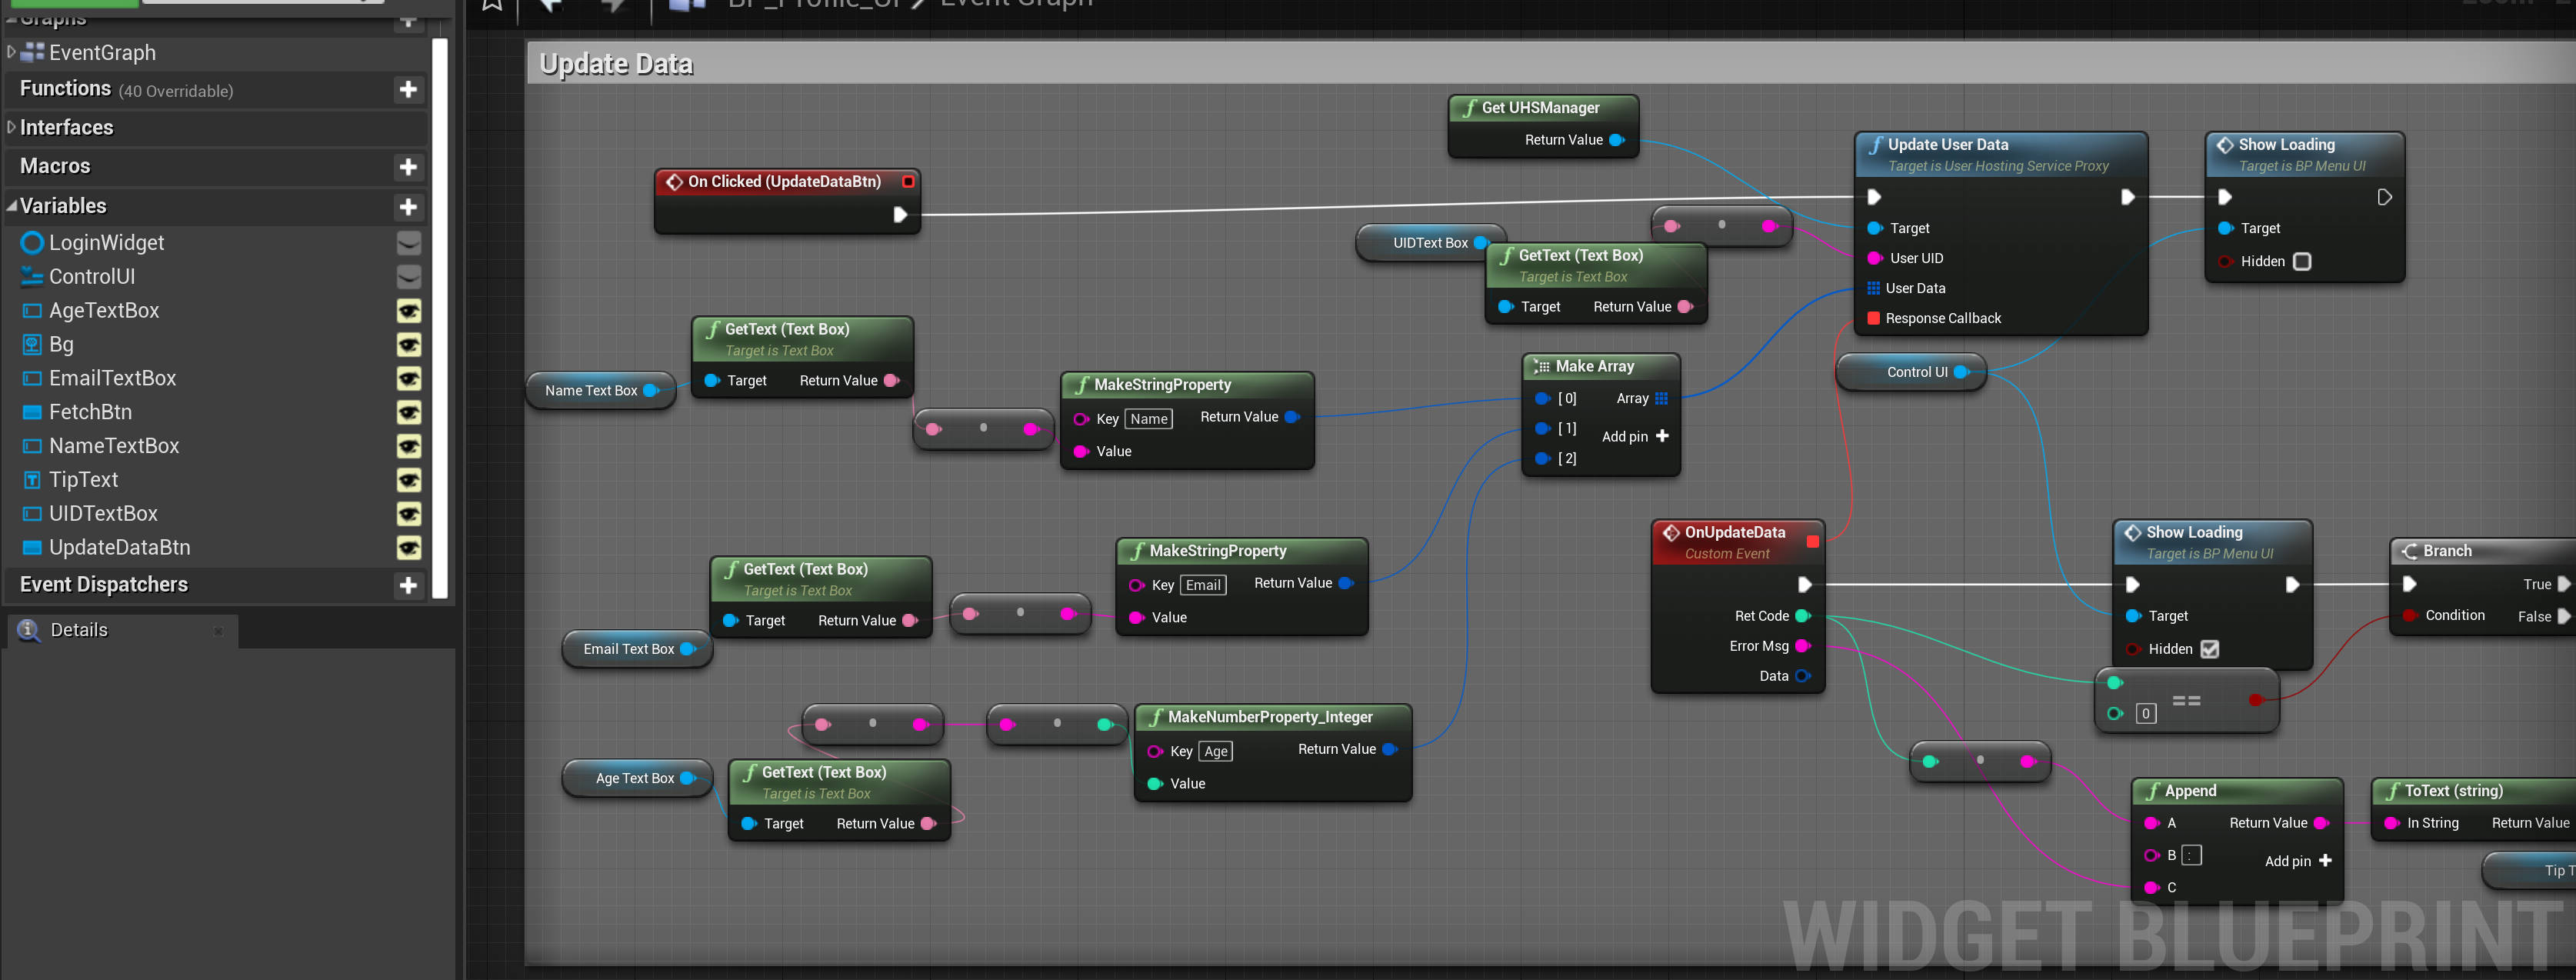
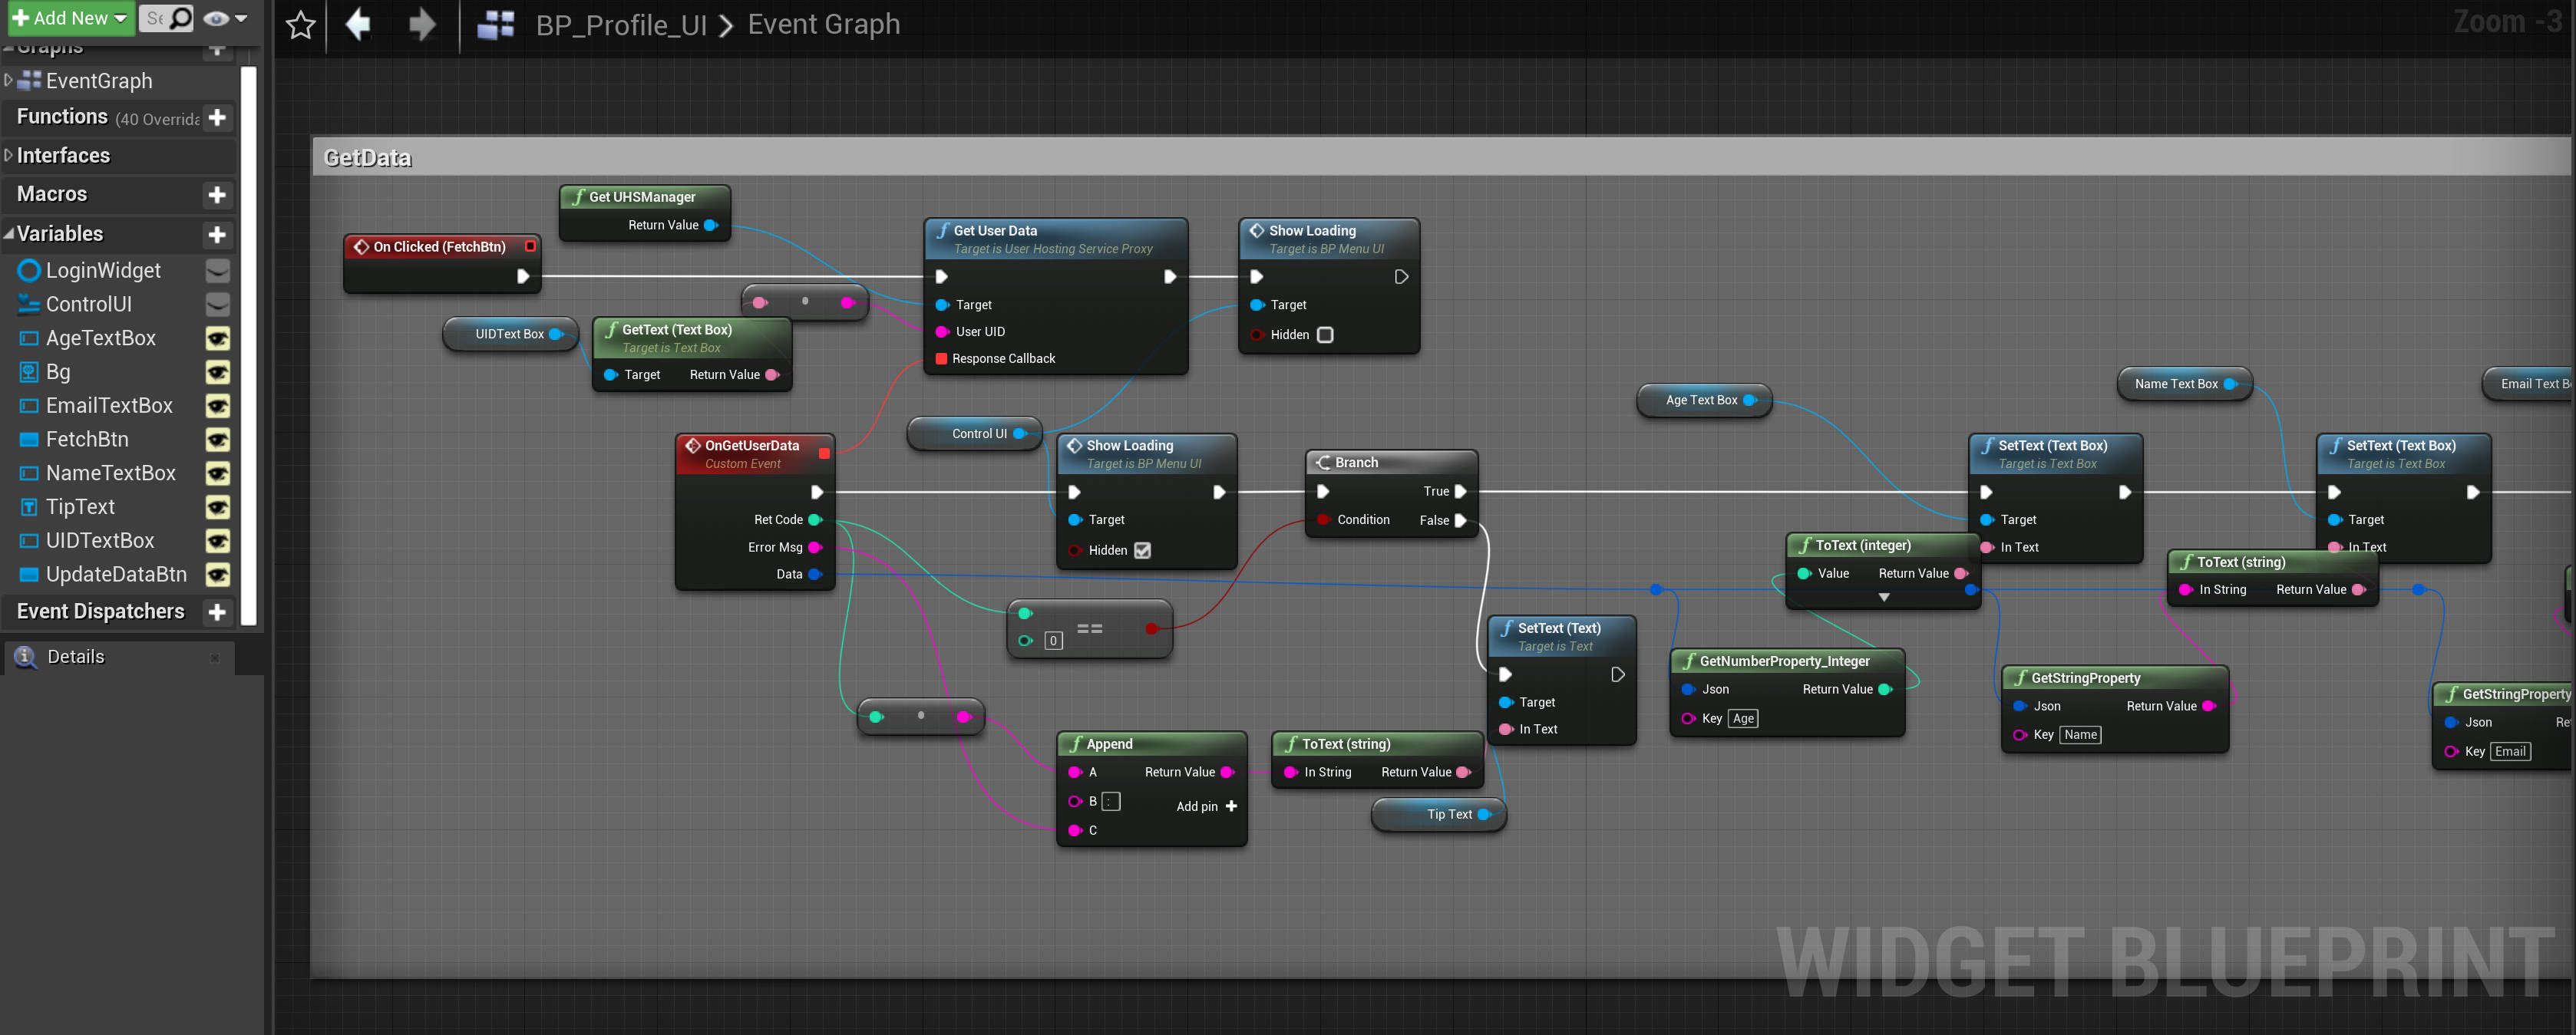
Open demo project and see the example from blueprint BP_Profile_UI. Use GetUserData and UpdateUserData interface to fetch or update user data, as follow.
3.2.3 Delete User
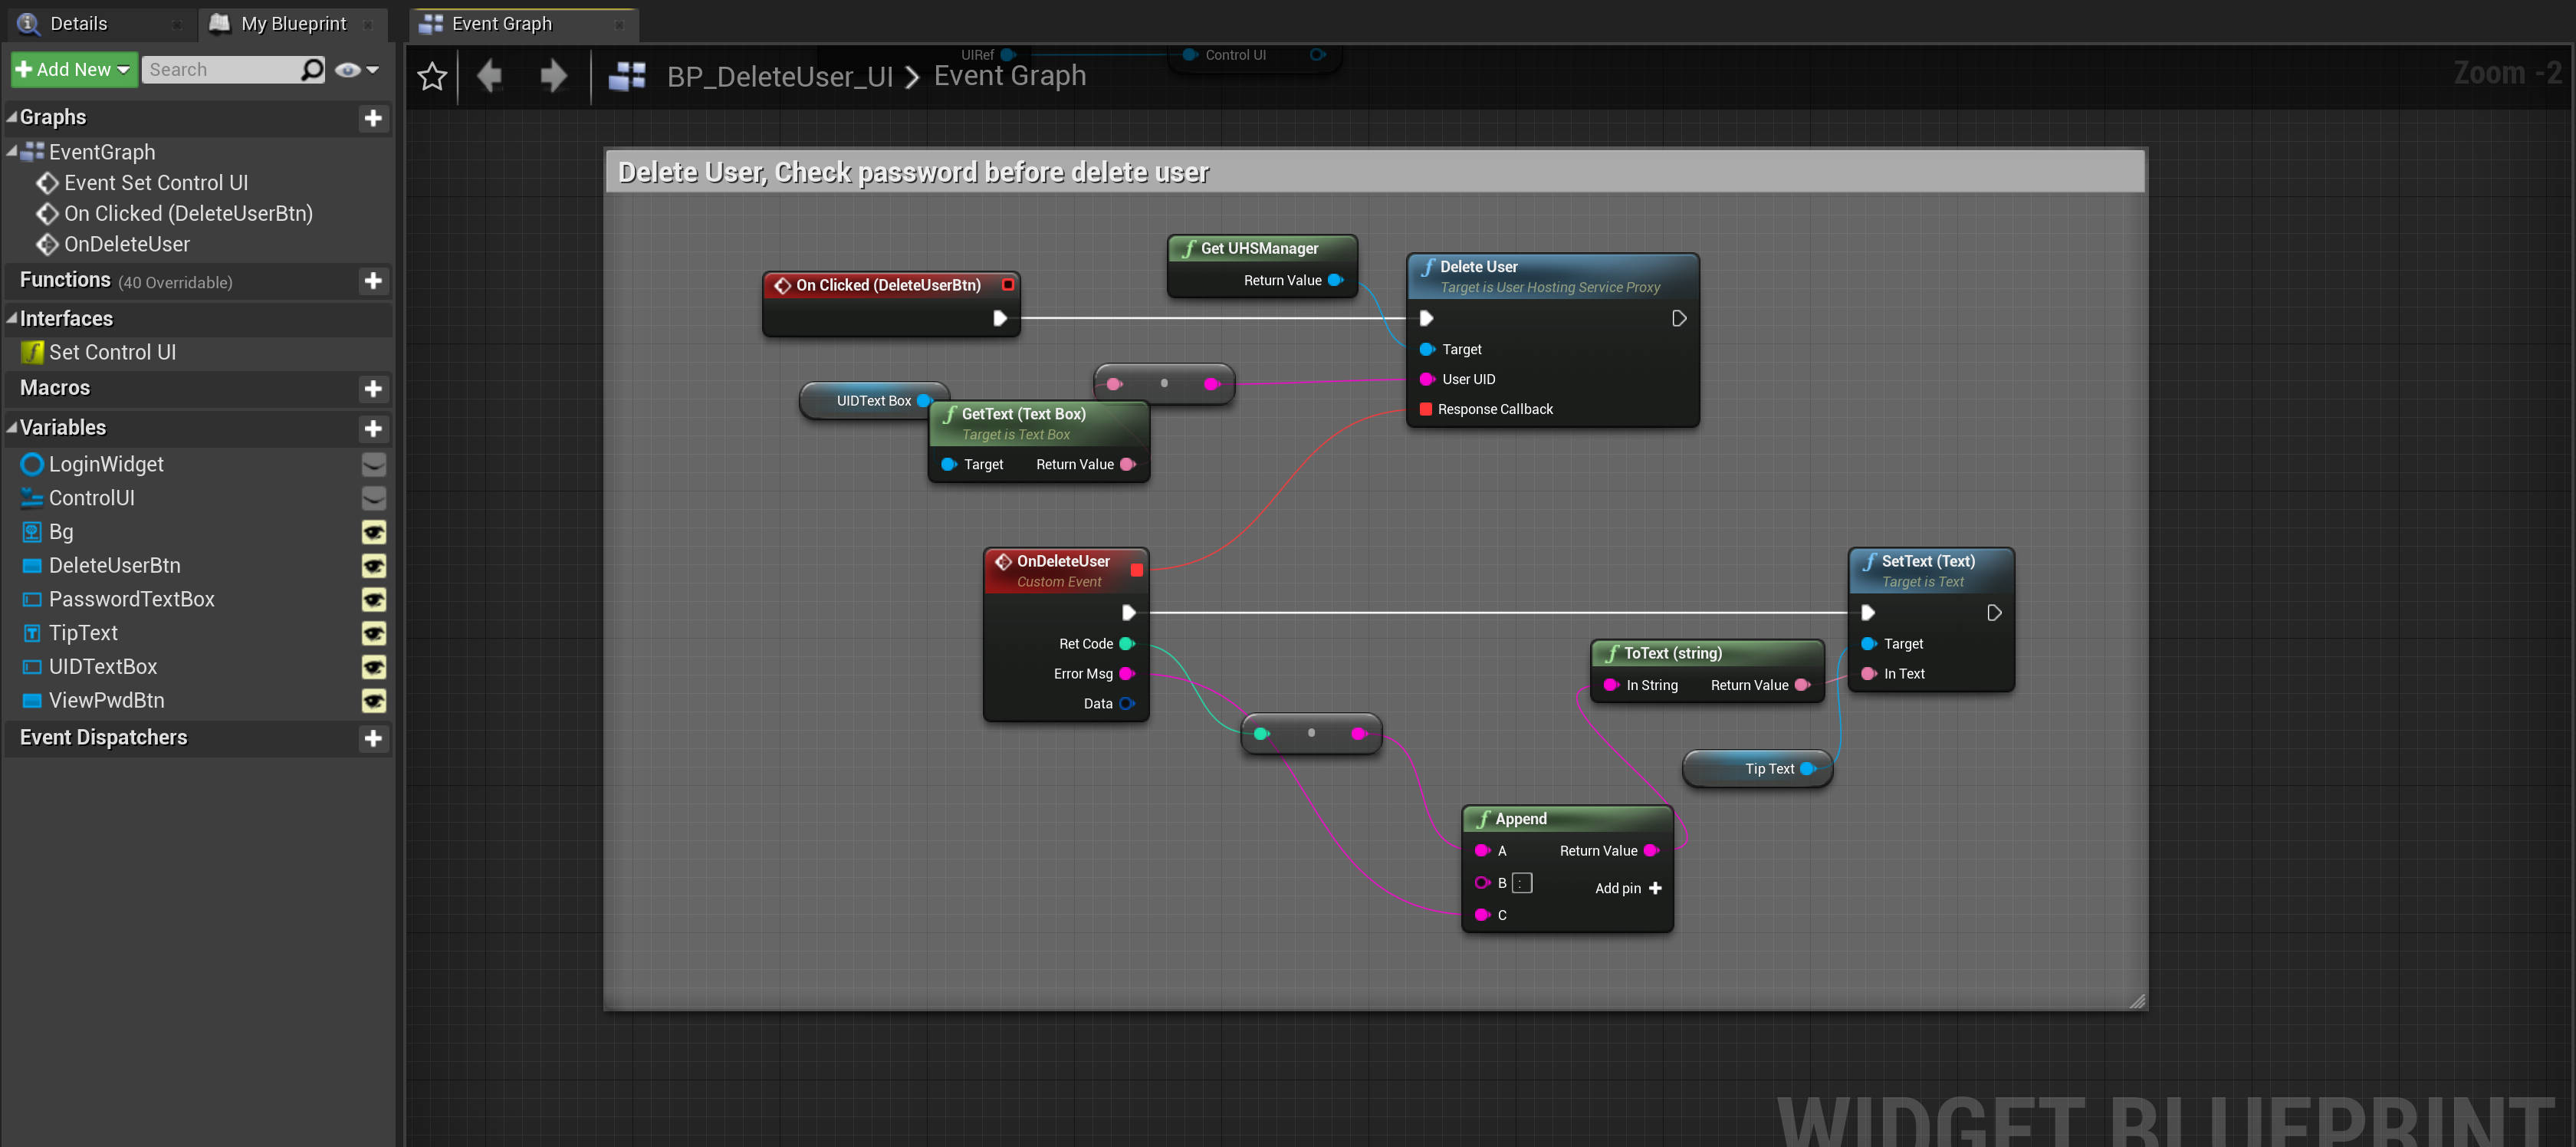
Open demo project and see the example from blueprint BP_DeleteUser_UI. Use DeleteUser interface of UHSManager to delete an user, as follow.
3.2.4 Get Application Config
Open demo project and see the example from blueprint BP_GetConfig_UI. Use GetAppConfig interface of UHSManager to get remote application config, as follow.
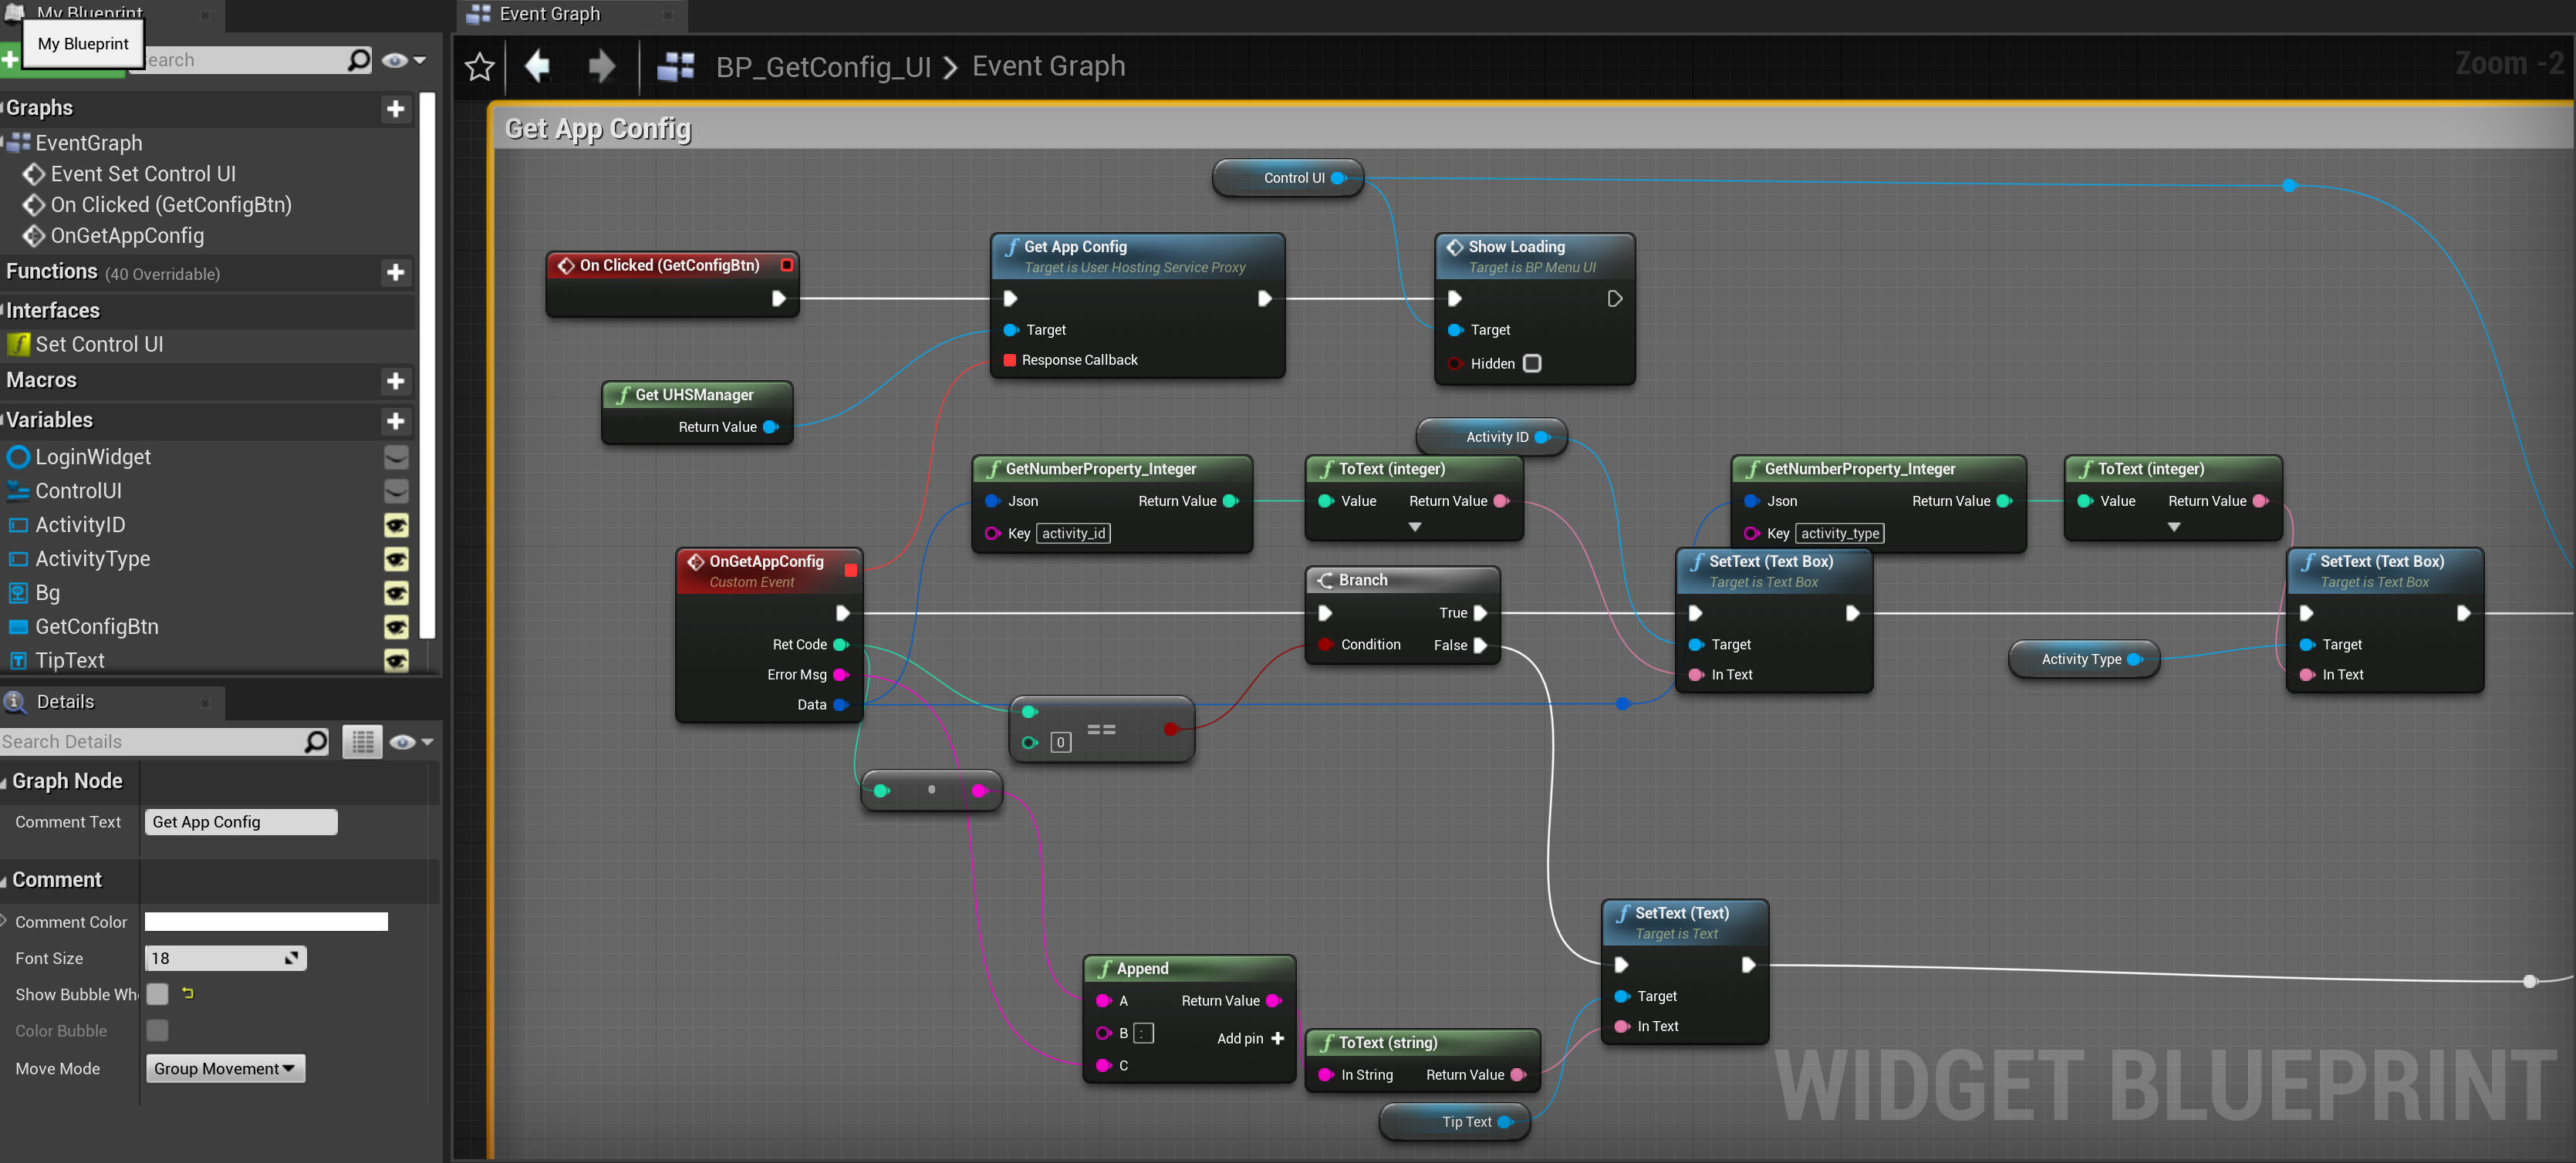
With this feature, you can easily update the config for your published application.
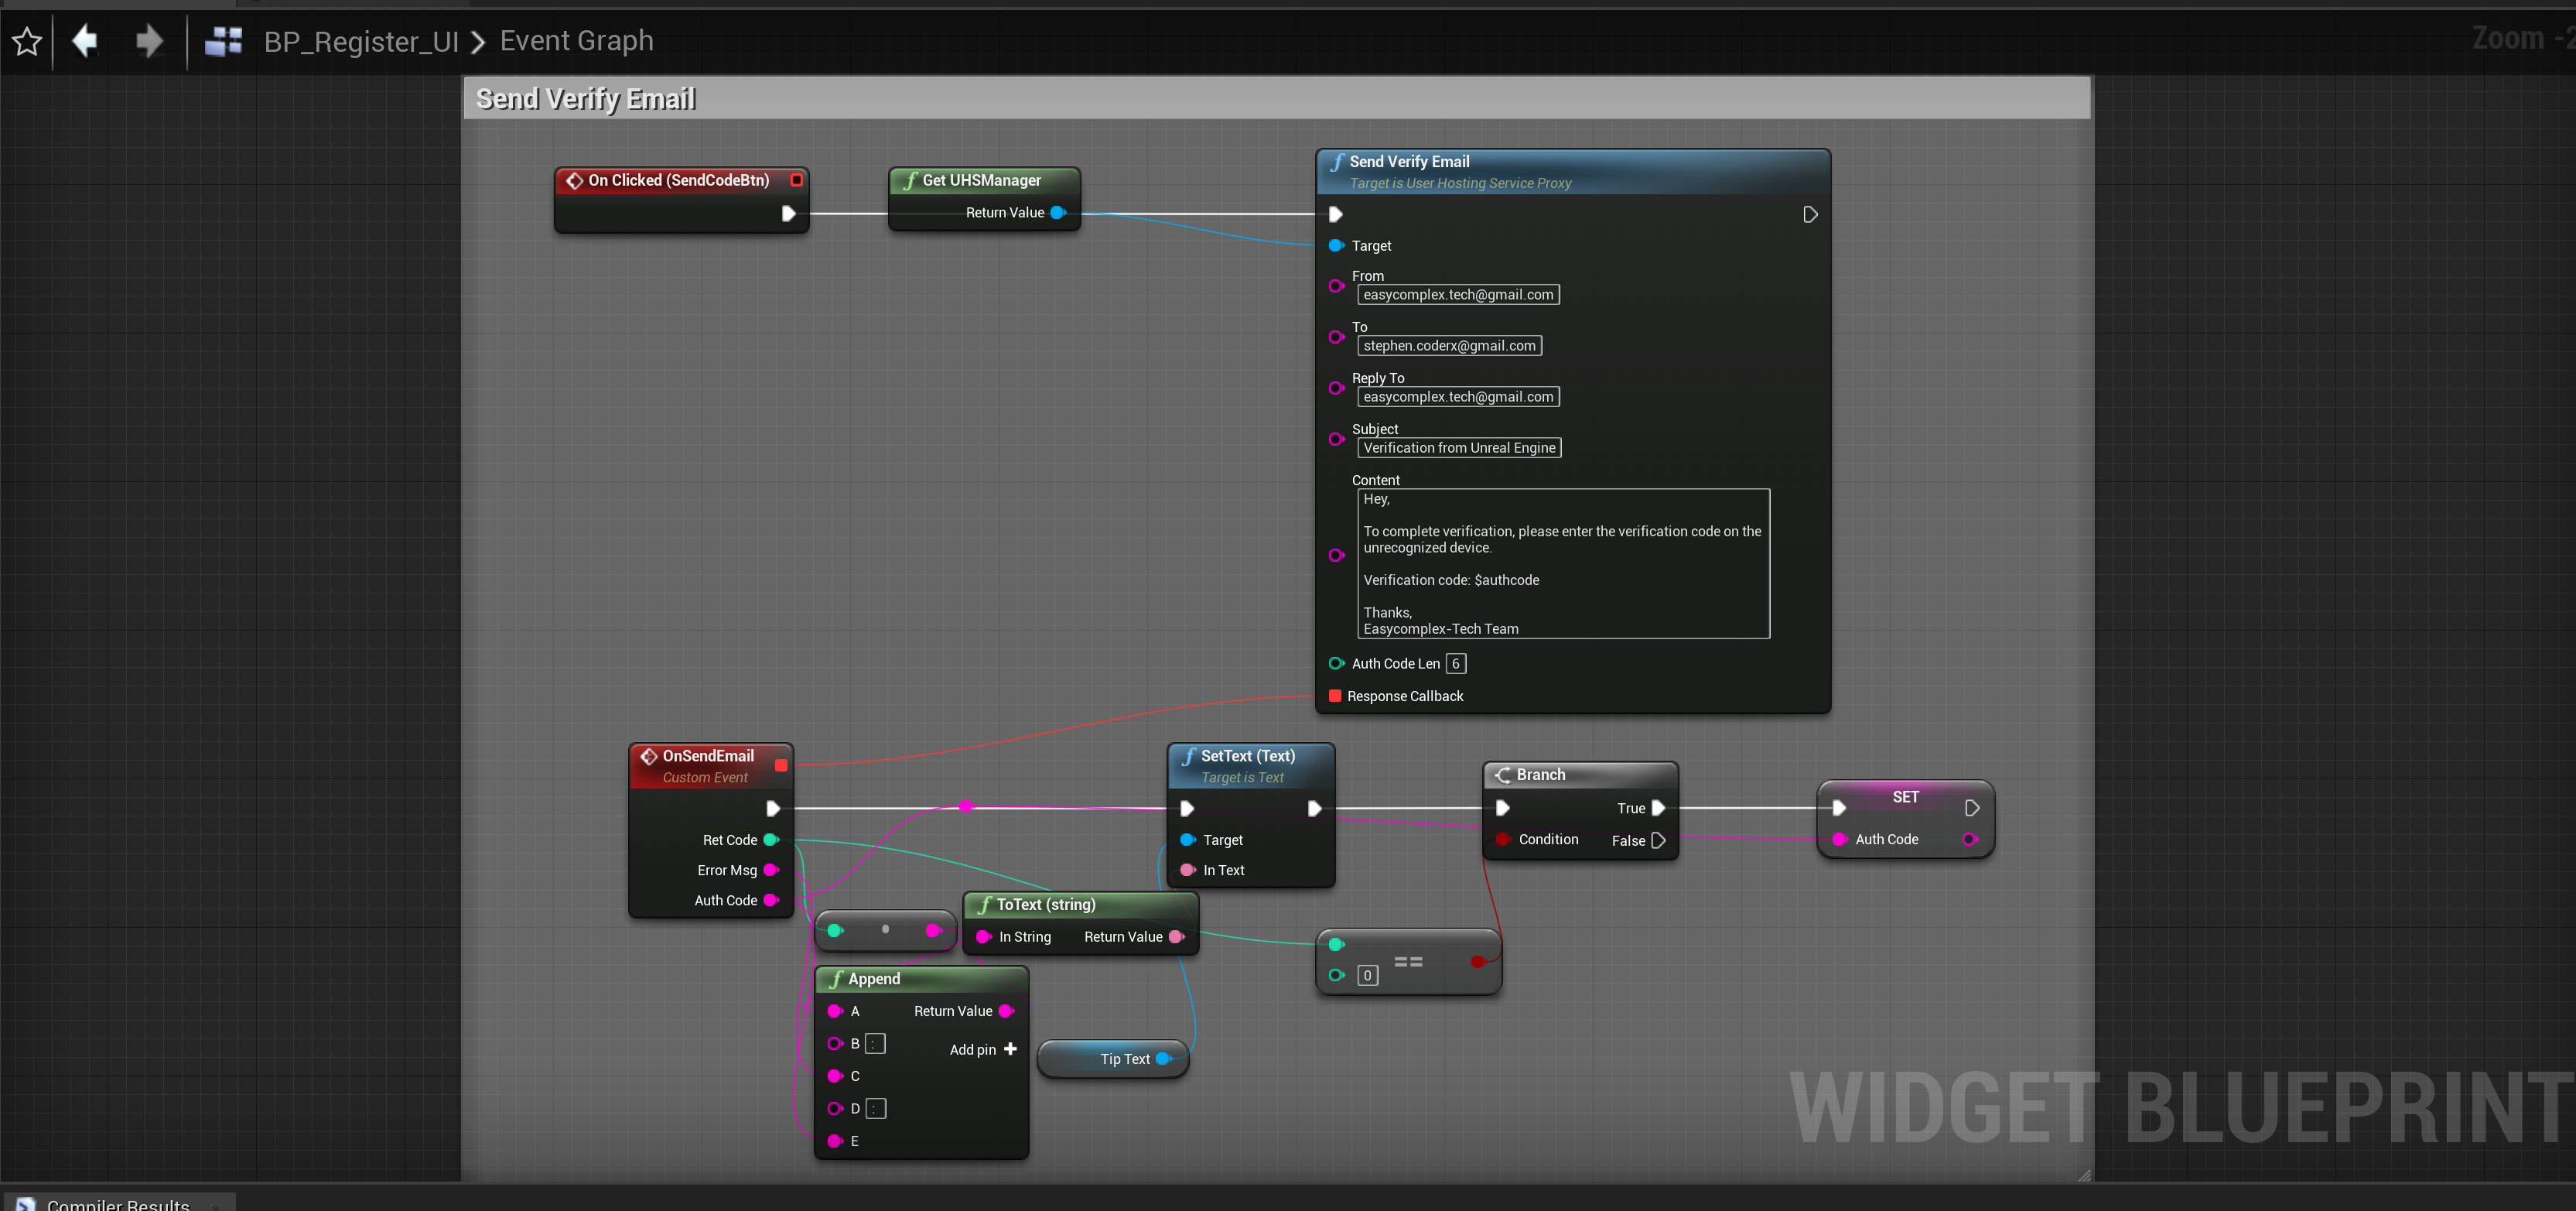
3.2.5 Send Verification Email
This feature is only for the subscribers of plan Plus or Pro. You can use our Compact Email Service as well.
Open demo project and see the example from blueprint BP_Register_UI. Use SendVerifyEmail interface of UHSManager to send verification email as follow.
-
From: The sender’s email address which will be shown in receiver side, such as noreply@exmaple.com.
-
To: The email address that will receive this email.
-
ReplyTo: The real email address that receiver will reply to.
-
Subject: The email subject.
-
Content; The body content of the email.
-
AuthCodeLen: The verification code length, which will not larger than 18.
Notice that you need to use $authcode inside your email content, which will be replaced to the real verification code while sending. You will reveive the verification code from callback function, which you can use to verify the user.
3.3 Return Code Definition
-
400: Network error.
-
401: Request data too frequently.
-
402: Too much pending request.
-
403: Invalid user data.
-
10000: Internal error.
-
10001: Invalid request.
-
10002: User account is null.
-
10003: Invalid user account.
-
10004: Invalid plan.
-
10005: Invalid client id.
-
10006: Invalid cliend api key.
-
10007: Invalid user id.
-
10008: Exceed user number limit.
-
10009: The length of user id is too long.
-
10010: User is already existing.
-
10011: User is not existing.
-
10012: Invalid user data.
-
10013: No enough emails amount.
-
10014: Invalid email data.
4 Customization
if you want to add the plugin to your own project, just following the steps given below.
-
Put plugin to folder “Plugins” in your project.
-
Right click your project file(.uprojcet) and select “Generate Visual Studio project files”
-
Open Visual Studio project and complile.
5 Support
In the event you are unable to find the information you seek, feel free to contact easycomplex.tech@gmail.com.